
Introduction
A while back I wrote a post about my experience with getting my Microsoft Surface Laptop 7th Edition working with a clean install of Windows 11, you can see the post here: Microsoft Surface Laptop 7th Edition – Andy Kemp.
Well I decided to look at this in more depth as I noticed when I did a reset of the device I would always get an error and then have to recover it using the USB drive again, which I then had to re-create. So I decided to look at this in a bit more depth and wondered if I could create a script to do it all for me.
The script I have written is not exclusively for a Surface Laptop 7th Edition, if you have the drivers for any device in an MSI file then I’d image it would work for those.
Creating the script
The script before was pretty simple I wanted to add the drivers from the MSI to the install.wim file so that I could install Windows 11, however, remember I still needed to use a keyboard or mouse and the USB had to be connected in to the USB-C port not USB-A.
Original Script
$msiPath = "C:\SurfaceDrivers\SurfaceLaptop7_ARM_Win11_26100_25.023.35949.0.msi"
$targetDir = "C:\SurfaceDrivers\Extract"
Start-Process msiexec.exe -ArgumentList "/a $msiPath /qb TARGETDIR=$targetDir"
Dism /Mount-Image /ImageFile:C:\Windows11\sources\install.wim /MountDir:C:\temp /Index:1
Dism /Image:C:\Temp /Add-Driver /Driver:C:\SurfaceDrivers\Extract /Recurse
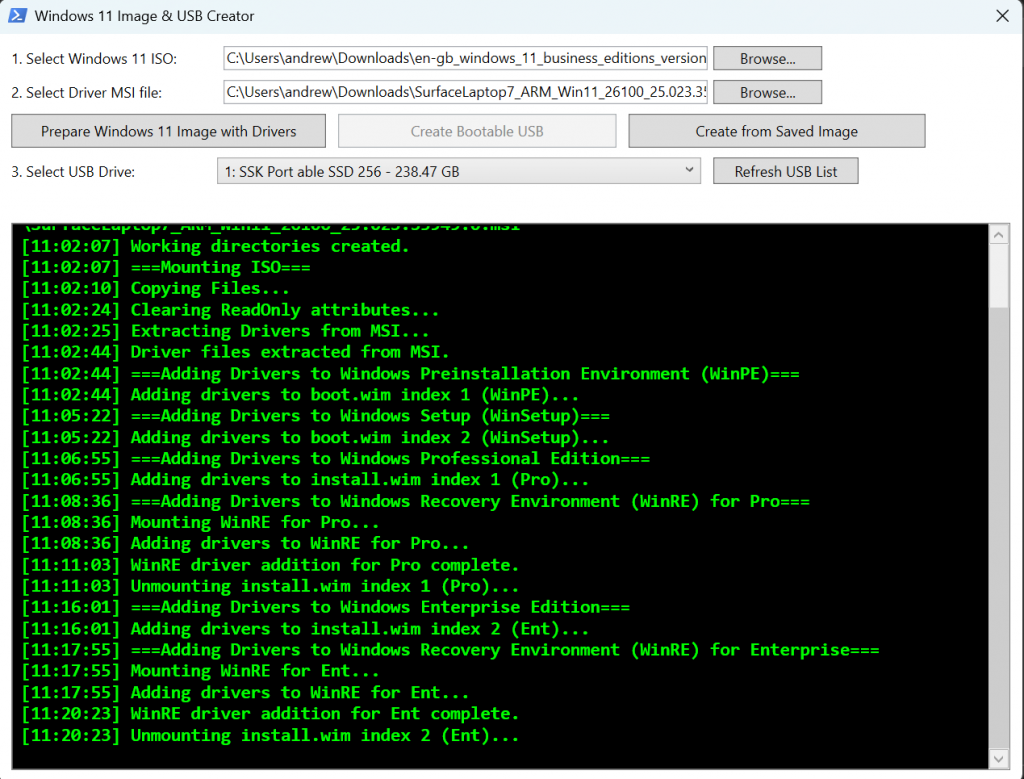
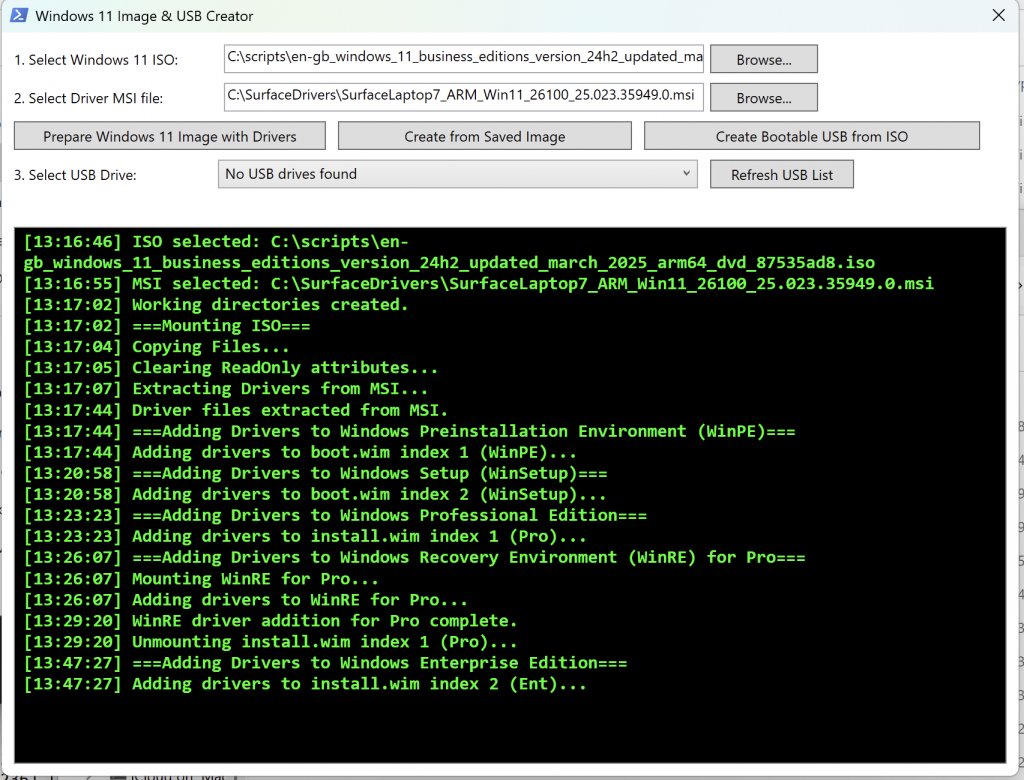
Dism /Unmount-Image /MountDir:C:\temp /CommitUpon further digging I discovered I also needed to prepare the boot.wim file (twice) as this contains the WinSetup and WinPE (Preinstall Environment) so using an index of 1 and 2. I also found out I needed to update the WinRE (Recover Environment) for Windows that is located within the mounted install.wim file. So, whilst install.wim was mounted I needed to mount another wim file locates in the MoundDir\Windows\System32\Recovery\winre.wim. So this needed to be in a separate mounted folder and the drivers added to this too.
I also thought I’d best update not inly for Enterprise I’d best update for Windows Professional as well. So I ended up with this:
$msiPath = "C:\SurfaceDrivers\SurfaceLaptop7_ARM_Win11_26100_25.023.35949.0.msi"
$targetDir = "C:\SurfaceDrivers\Extract"
Start-Process msiexec.exe -ArgumentList "/a $msiPath /qb TARGETDIR=$targetDir"


Dism /Mount-Image /ImageFile:C:\Windows11\sources\boot.wim /MountDir:C:\temp\WinPE /Index:1
Dism /Image:C:\Temp\WinPE /Add-Driver /Driver:C:\SurfaceDrivers\Extract /Recurse
Dism /Unmount-Image /MountDir:C:\temp\WinPE /Commit

Dism /Mount-Image /ImageFile:C:\Windows11\sources\boot.wim /MountDir:C:\temp\WinSetup /Index:2
Dism /Image:C:\Temp\WinSetup /Add-Driver /Driver:C:\SurfaceDrivers\Extract /Recurse
Dism /Unmount-Image /MountDir:C:\temp\WinSetup /Commit

Dism /Mount-Image /ImageFile:C:\Windows11\sources\install.wim /MountDir:C:\temp\Windows11 /Index:1
Dism /Image:C:\Temp\Windows11 /Add-Driver /Driver:C:\SurfaceDrivers\Extract /Recurse
Dism /Mount-Image /ImageFile:C:\temp\Windows11\Windows\System32\Recovery\winre.wim /MountDir:C:\temp\WinRE /Index:1
Dism /Image:C:\Temp\WinRE /Add-Driver /Driver:C:\SurfaceDrivers\Extract /Recurse
Dism /Unmount-Image /MountDir:C:\temp\WinRE /Commit
Dism /Unmount-Image /MountDir:C:\temp\Windows11 /Commit

Dism /Mount-Image /ImageFile:C:\Windows11\sources\install.wim /MountDir:C:\temp\Windows11 /Index:2
Dism /Image:C:\Temp\Windows11 /Add-Driver /Driver:C:\SurfaceDrivers\Extract /Recurse
Dism /Mount-Image /ImageFile:C:\temp\Windows11\Windows\System32\Recovery\winre.wim /MountDir:C:\temp\WinRE /Index:1
Dism /Image:C:\Temp\WinRE /Add-Driver /Driver:C:\SurfaceDrivers\Extract /Recurse
Dism /Unmount-Image /MountDir:C:\temp\WinRE /Commit
Dism /Unmount-Image /MountDir:C:\temp\Windows11 /Commit
Not much in the way of things but it worked, it added the drivers to both versions of Windows 11, the WinPE, WinSetup and WinRE images too.
Next I needed to copy the files to a bootable USB drive and voila the USB Drive worked and I could use both the keyboard and mouse in the setup.
This then got me thinking about also creating a bootable USB drive from the script. The way I was creating my bootable USB was using the Recovery Drive tool and selecting to not backup system files. So I got the script to force that to run and then I unselected the backup system files option created the recovery drive and then copied the files to the drive.
This worked ok but there was still a lot of manual processes, this is when I took it to Copilot for GitHub, and how this then became my new best friend.
Adding a GUI to the script
So I took this very very very basic script to Copilot for GitHub and ran it through there and it asked if I wanted to add a GUI to it at all, I’d never actually thought about that for my PowerShell Scripts before, this is a genius idea. So I then started experimenting with this.
- Adding the option to select the Windows 11 source files
- adding the option to select the Drivers MSI file etc…
I then thought why not get the script to mount the ISO and copy the files to a location to use? so rather than selecting the Source files it became select the ISO file. The ideas just started to fly in from there and the script took on a whole new meaning
Bootable USB
The next task was to make the USB Drive bootable, I’d been doing that with the Recovery Drive tool in Windows, however I was wondering if I could use something like bootsect.exe, so after “talking” to my new best friend Copilot for GitHub I discovered that I did not need to use bootsect.exe if I was using a UEFI bios and using FAT32… so, I then thought what if I got the script to remove all data on the USB and then create a FAT32 partition and copy the files there, which meant I needed to split the WIM file up.
After a lovely conversation with Copilot for GitHub I got the code I need for this and incorporated it in to my script. So a simple copy of the files to a FAT32 USB worked and the drive was bootable.
Reporting
The script at this point was working and did what I needed. I was getting very exciting about what else I could do with it. So I added in some reporting, now, I’m a geek so I opted for a black “terminal” emulator with greet text to provide the steps it was performing.
Drive selection
I then wanted to be able to select the USB Drive if I had more than one plugged in, also. I also thought it would be good to prompt if there was no USB detected so I added some logic in for this. This meant that I could connect the USB drive at anytime.
Save image
Another thought was that it takes a very long time to prepare the image so, why not save it? sure it takes up space on your machine, but if you need to create a few of these then why not use a saved image, so I added that logic to the script. Along with that I then added an option to load a saved image and it would then prepare the USB from that. Lets face it running all these DISM commands takes about 30-40 minutes.
So this is great this is all working as I’d have hoped for but then I thought about another add-on create a bootable USB direct from an ISO.
Also the logic in the script will detect if there is a USB drive connected and if not prompt to have one connected and then create the bootable USB so the Create bootable USB button is no longer needed.
Create USB from ISO
One other option I thought would be handy is the create USB direct from ISO. Sure there are tools like Rufus to do this but, why not add that in to the script so I did.
The complete script
If you want to use the script you can find it here on GitHub: andrew-kemp/Win11ImagePrep: Windows 11 Image Preparation Tool
Please feel free to use and edit, and if there is something else you’d like to see in there then please let me know.
Conclusion
I have tested this script to create a prepared bootable USB for both my Microsoft Surface Laptop 7th Edition (ARM) and also my Surface Pro 6 (x64) and it works perfectly and makes like a lot easier when needing to prepare images with drivers to install Windows 11.
I still would have thought that Windows 11 would have installed on the Surface Laptop 7th Edition with minimal effort….
Was this helpful?
Let me know what you think!