This is part 2 of my Always On VPN series
You can review the pervious posts if required:
- Always On VPN Entra Join – Part 1 Whats needed – Andy Kemp
- Always On VPN Entra Join – Part 2 Certificate Templates – Andy Kemp
- Always On VPN Entra Join – Part 3 Core Always On VPN Infrastructure – Andy Kemp
- Always On VPN Entra Join – Part 4 Configure Always On VPN for Entra Joined Devices – Andy Kemp
- Always On VPN Entra Join – Part 5 Deploy Always On VPN for Entra Joined Devices – Andy Kemp
Introduction
Certificates are at the heart of Always On VPN as this is what is used to authenticate the user. Group Policy needs to be updated when deploying the certificates to servers and users via Active Directory. When deploying via NDES the certificates are deployed via a Service Account.
This section of the series will go through getting the User Groups setup, the Service Account and the Certificate Templates configured.
Lab Environment
So my setup is configured as so:
| Server | Role | Details |
| Akdec-dc1 | Domain Controller | ad.andykemp.dev |
| Akdev-ca | Certificate Authority | AndyKempDev-CA |
| Akdev-ec | Entra Connect | |
| Akdev-rras | Routing and Remote Access Service | vpn.andykemp.dev |
| Akdev-nps | Network Policy Service | |
| Akdev-ndes | Network Device Enrolment Service | SCEP |
| Akclient-1 | Domain Joined Client | |
| Akclient-2 | Entra Joined Client |
Certificate Auto-Enrollment via Group Policy
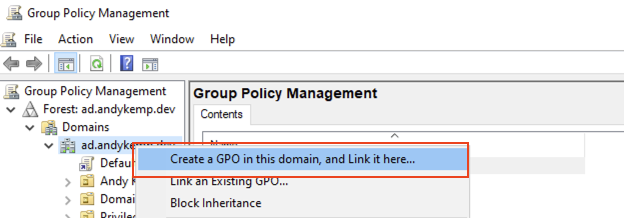
The NPS, RRAS and NDES Servers and Domain Users rely on GPO to deploy the certificates. With this in mind the first thing to do is to create an auto-enrollment policy:
Load up the Group Management Console and right click on the root of the domain and select Create a GPO in this domain, and link it here…:
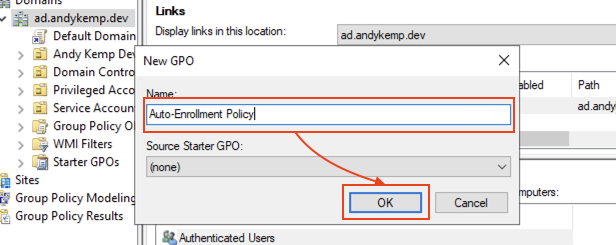
Give it a meaningful name and then click on OK:
Right click on the newly created GPO and select Edit:
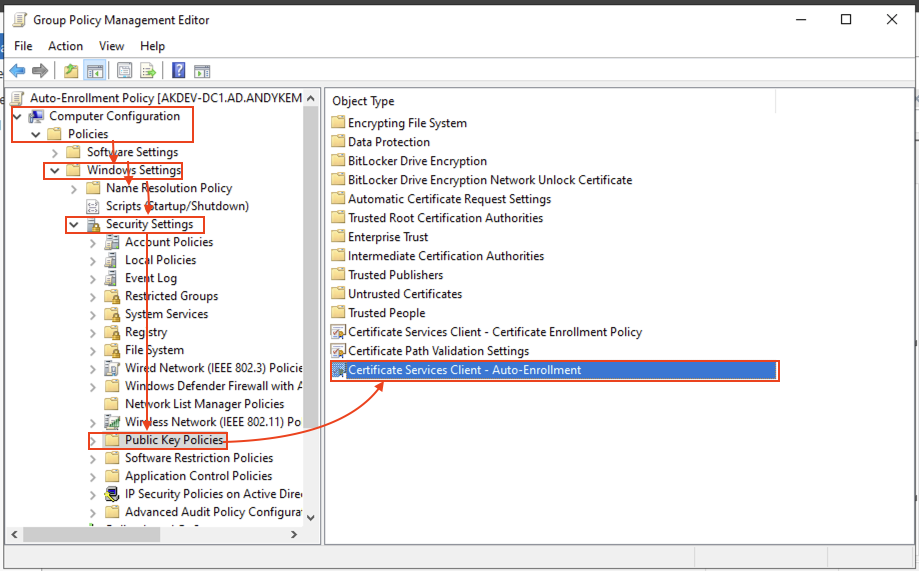
Computer Configuration
This is needed for the server infrastructure

Go to: Computer Configuration > Policies > Windows Settings > Security Settings > Public Key Policies and then double Click on Certificate Services Client – Auto – Enrollment:
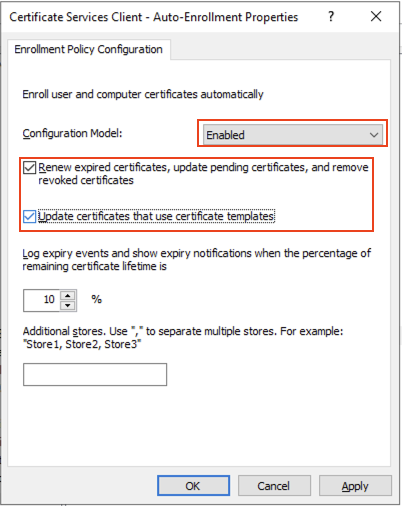
Edit the properties as below:
Configure Model: Enabled
Select both Renew expired certificates that use certificate templates and Update certificates that use certificate templates and then click on OK:
User Configuration
This is only required if you are going to deploy to Always On VPN to Domain Joined Devices, so if you are in the same Editor go to
User Configuration > Policies > Windows Settings > Security Settings > Public Key Policies:
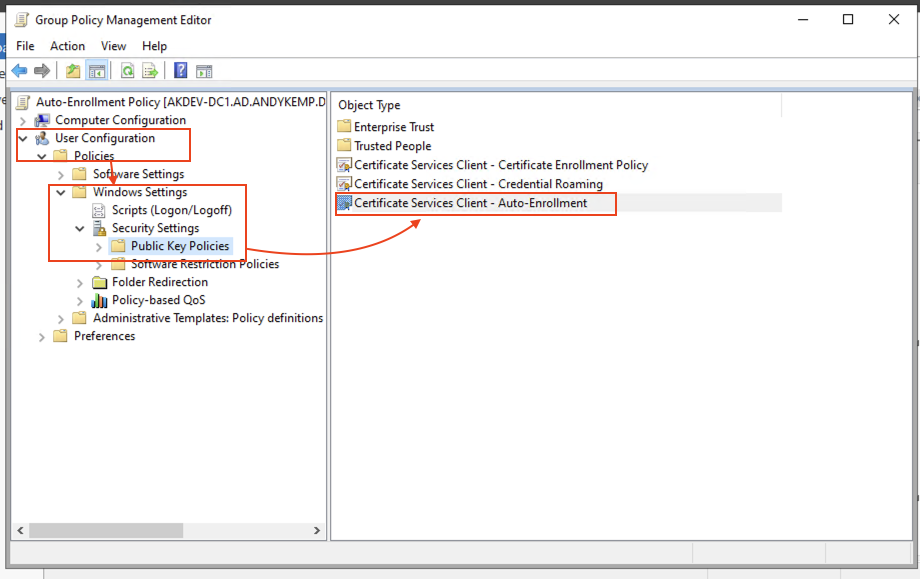
Double click on Certificate Services Client – Auto-Enrollment and make the same changes as above.
Configure Model: Enabled
Select both Renew expired certificates that use certificate templates and Update certificates that use certificate templates and then click on OK:
Thats the Group Policy part out the way.
AD Security Groups and Service Account
In order to deliver the policies to the servers and the users there are a few security groups that are needed. The Service account is used for the NDES infrastructure later.
So I’ll not bother doing any screen shots of this as hopefully if you’re doing this you’ll know how to create a security group 🙂 but you will need the following groups
| Group Name | Group Description | Members |
| VPN Server | Group to target RRAS servers | akdev-rras |
| NPS Server | Group to target NPS Servers | akdev-nps |
| VPN Users | Group for all VPN users | andy@andykemp.dev |
| NDES Server | Group for all NDES Servers | akdev-ndes |
There are no specific requirements for both the groups and then Service Account other than for the Service Account the password need to be long, strong and complex and set to never expire. It only needs to be a member of Domain Users my service account is svc_NDES.
Certificates
As mentioned above the following certificates are needed:
- VPN Server
- NPS Server
- NDES Server
- VPN User (Domain Joined)
- VPN User (Entra Joined)
These certificates are created from duplicates of either the RRAS and IAS certificate or the User Certificate which are then issued to Active Directory.
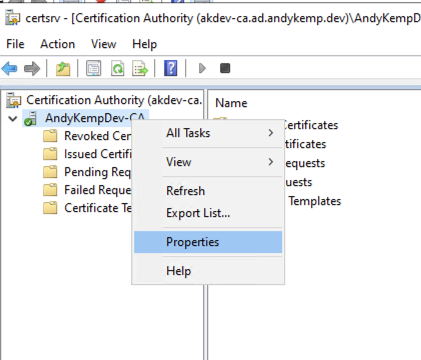
To create a duplicate of the certificates required simply connect to the Certificate Authority right click on Certificate Templates and click on Manage:
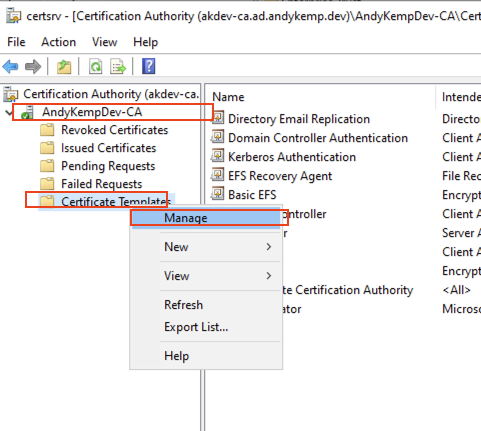
Then select the Certificate you want to duplicate and then right click and select Duplicate:

This then will create a copy of the Certificate where you can make the changes required. As mentioned the VPN, NPS and NDES certificates should be duplicates of the RAS and IAS Server certificate template and the VPN User Domain Joined and VPN User Entra Joined will be duplicates of the User Template.
NB As per Microsoft when creating the certificates do not click on OK until you have made all the settings as some settings can only be configured at template creation.
The VPN, NPS and VPN User (Domain Joined) Certificates are created as per this MS Doc:Tutorial – Deploy Always On VPN – Configure Certification Authority templates | Microsoft Learn
The NDES and VPN User (Entra Joined) are created with some differences.
VPN Server
Duplicate the RAS and IAS Server Template and configure the following settings:
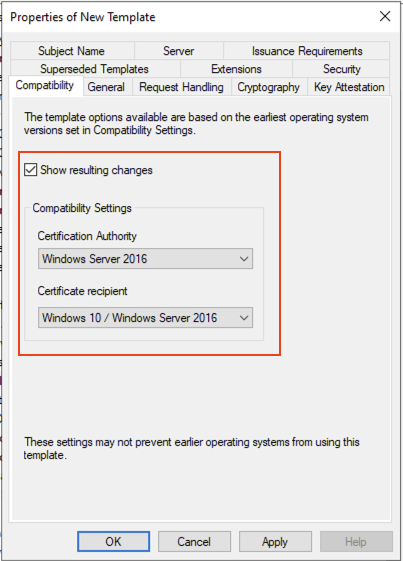
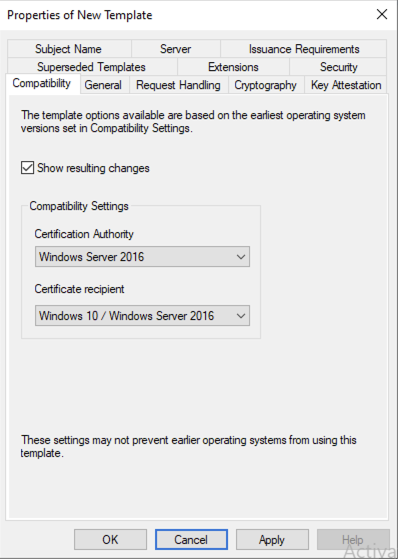
Set the compatibility as below. Don’t worry about the warning and click OK for the Resulting Changes.
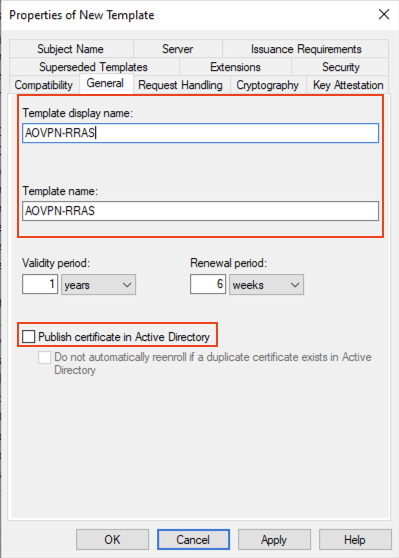
On the General tab give it a meaningful name and ensure that the Publish certificate in Active Directory is not selected:
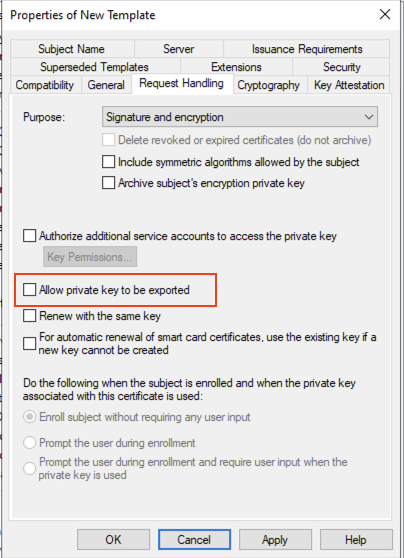
On the Request Handling tab ensure that the Allow private key to be exported is not selected:
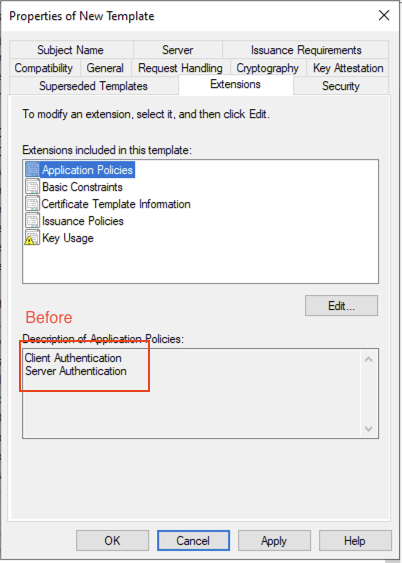
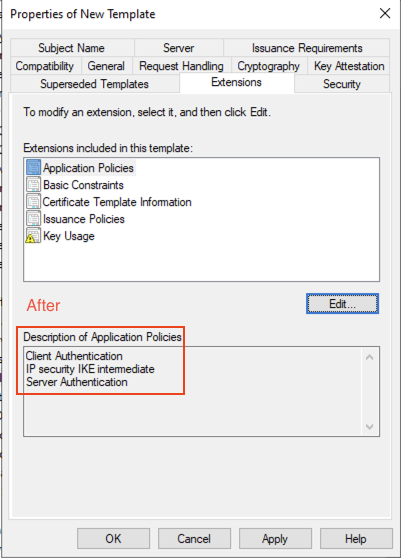
Edit the Application policies to add IP security IKE Intermediate as an additional application policy on the Extensions tab
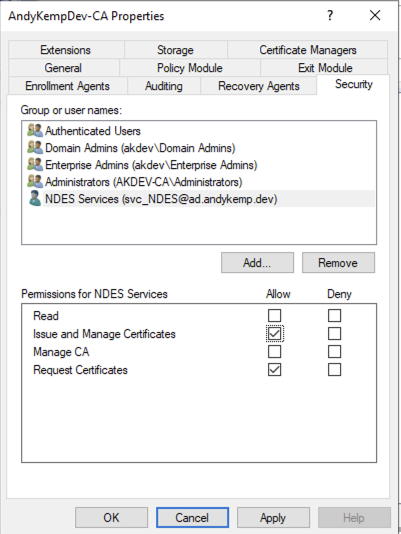
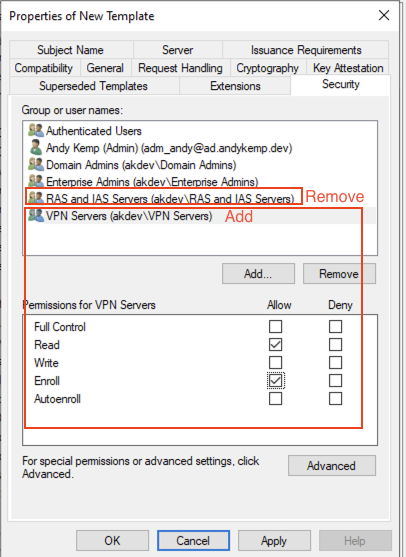
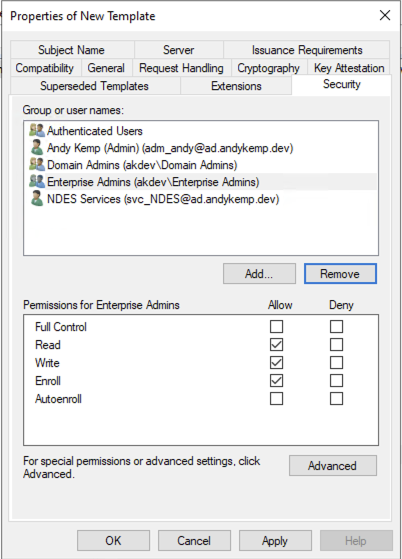
On the Security tab add the VPN Servers security group to the permissions and select Enroll and then remove the RAS and IAS Servers from the list:
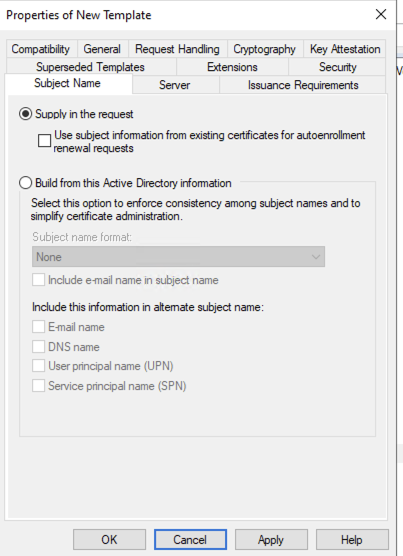
Lastly, on the Subject Name tab ensure that Supply in the request is selected. Select OK on the notification.
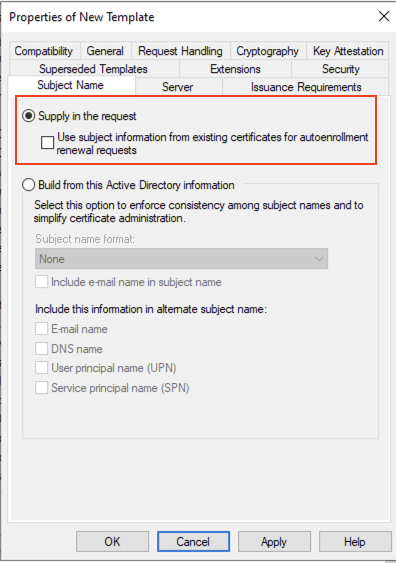
At this point you can now click on OK to complete the VPN Server Certificate.
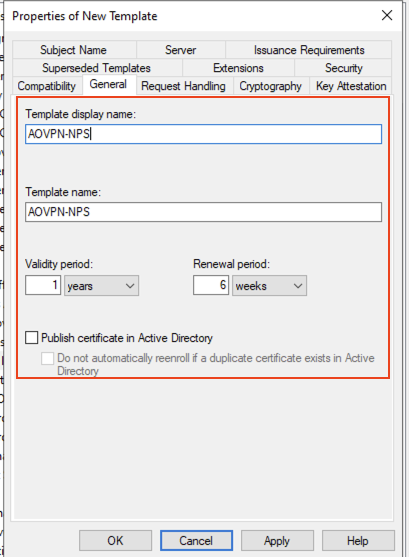
NPS Server
Duplicate the RAS and IAS Server Template as done previously and make the following changes:
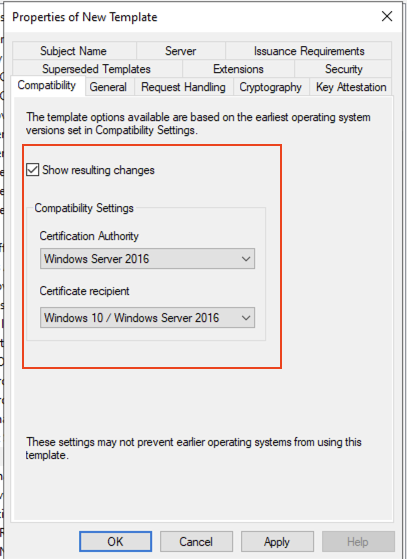
Set the compatibility as below. Don’t worry about the warning and click OK for the Resulting Changes.
Set the compatibility as below. Don’t worry about the warning and click OK for the Resulting Changes.
On the General tab give it a meaningful name and ensure that the Publish certificate in Active Directory is not selected:
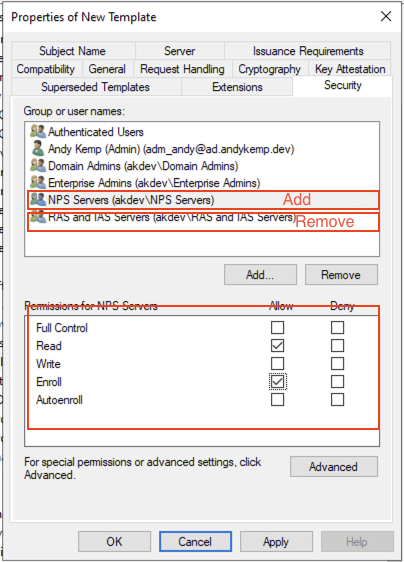
On the Security tab add the NPS Servers security group and ensure that Enroll is selected and remove RAS and IAS Servers:
Once the security permissions have been added click OK to complete the certificate template creation
NDES Server
Again duplicate the RAS and IAS Server Template as before, however, you’ve guessed it the Name needs to be meaningful AOVPN-NDES and the security needs to include the security group NDES Servers with the permission to Read and Enroll and remove RAS and IAS Servers from the security settings
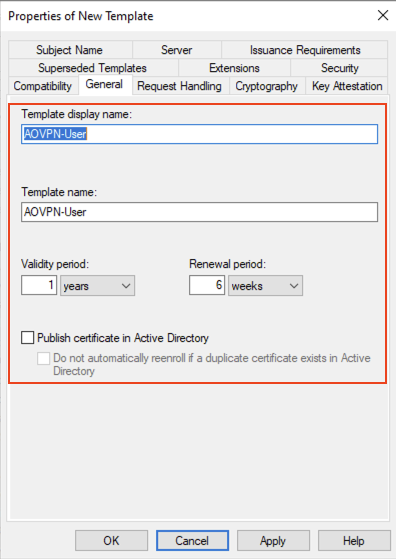
VPN User – Domain Joined
For the next two certificates we need to duplicate the User Template.
On the Compatibility tab make the following changes (as before)
Provide a meaningful name on the General tab and clear the Publish certificate in Active Directory:
For Domain Joined I have called it AOVPN-User
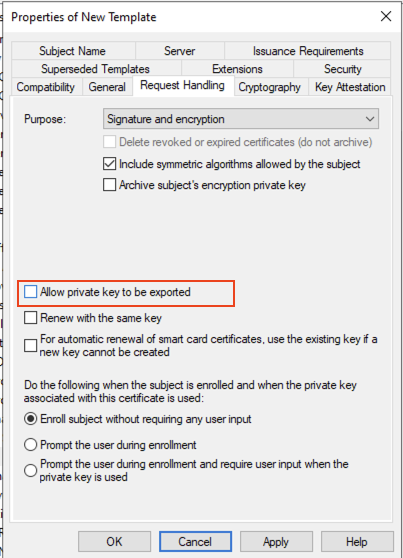
On the Request Handling tab remove the option to Allow private key to be exported:
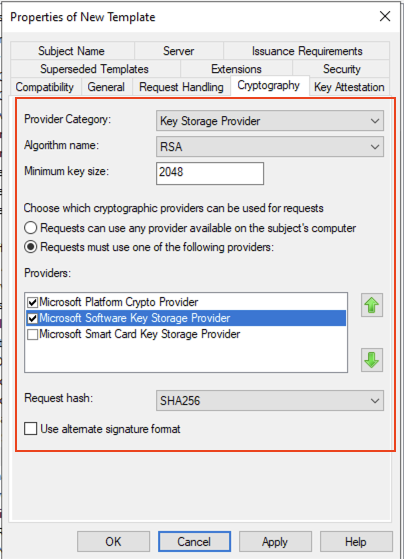
On the Cryptography tab make the following changes:
Provider Category: Key Storage Provider
On the option to Choose which cryptographic providers can be used for requests select: Requests must use one of the following providers
Then select Microsoft Platform Crypto Provider and Microsoft Software Key Storage Provider.
Then ensure that the Request hash is set to SHA256
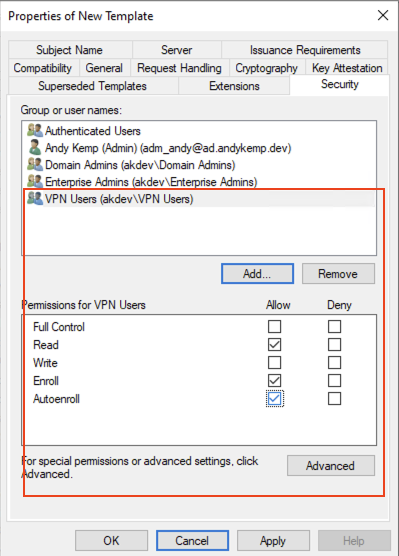
Edit the Security tab accordingly, however for both remove the Domain Users permission
For Domain Joined remove Domain Users and add VPN Users for Entra Joined add the NDES Service account.
For Domain Joined the permissions for Domain Users needed are Read, Enroll, Autoenroll:
On the Subject Name tab for leave Build from this Active Directory information selected and remove Include e-mail name in subject name and E-mail name
Now press OK, and that it, your user certificates are created.
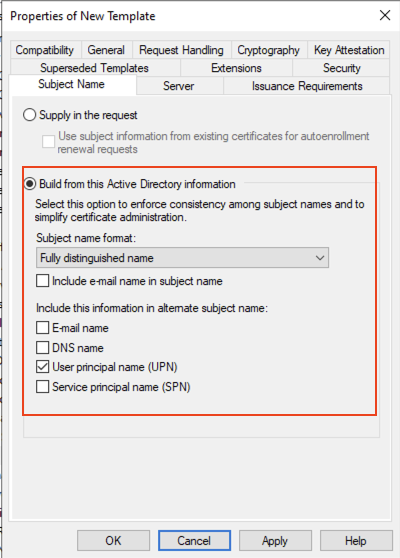
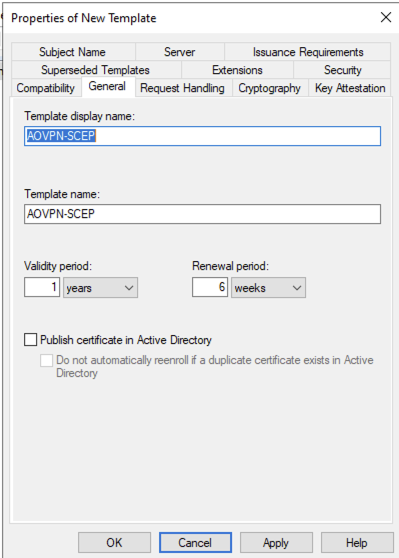
SCEP Certificate
Provide a meaningful for the Certificate in my case I called it AOVPN-SCEP
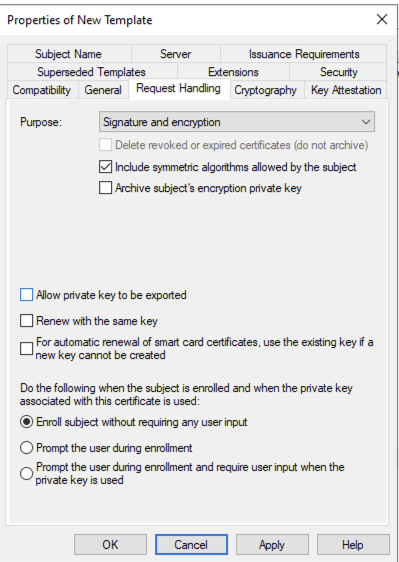
On Request Handling remove the option to Allow private key to be exported
On the Security tab add the NDES Service account and enable Allow for Enroll and then remove the Domain Users group
On the Subject Name tab the Subject Name is to be Supply in the request answer OK to the warning prompt when Supply in the request:
Issue the new certificate templates
Now you have the certificates created you need to issue them so the servers/users can obtain them.
Back in the certificate authority manager right click on Certificate Templates goto New and select Certificate Template to Issue:
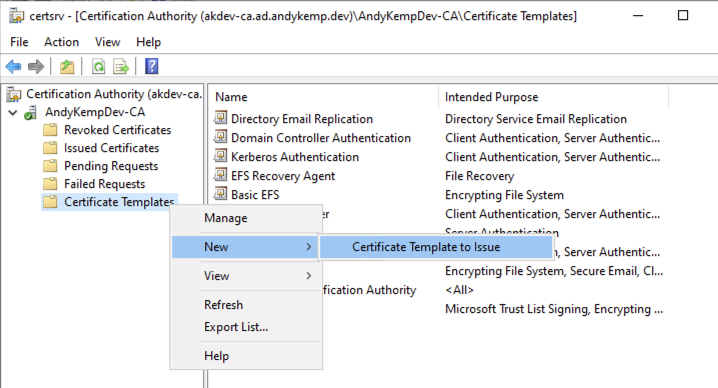
Select the newly created templates and then click OK:
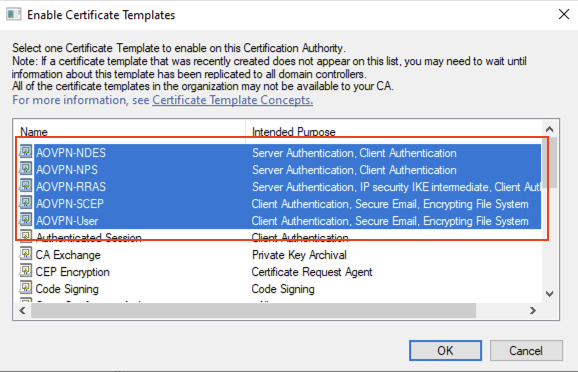
The certificates will then be avaliable in AD:
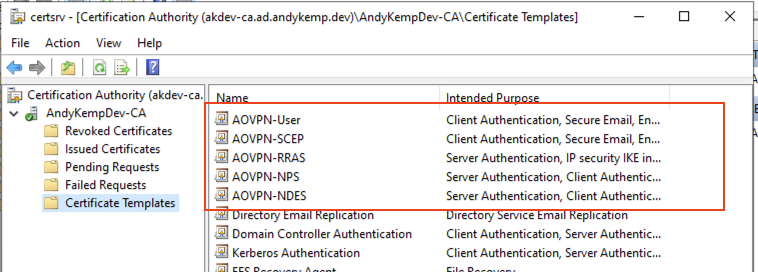
At this point you are now left with the certificates in place for Always On VPN.
Part 3 will be to get the servers prepped, installed and configured
Was this helpful?
Let me know what you think!