
Installing the Global Secure Access client is straightforward. Proving that it forwards the traffic you expect takes a little more work.
A successful Intune installation and a connected client are useful starting points. Neither tells you that the right forwarding rules have reached the device or that a particular connection has travelled through the service.
An installed client isn’t proof of a working deployment.
In Part 1, we’ll deploy to a small Windows pilot and test Microsoft traffic forwarding. Private Access applications, browser hardening, Intune Remediations and ongoing update management can follow later.
Lab verification: This article was developed using a Windows 11 test device managed through Microsoft Intune. The application packaging, deployment configuration, client installation and Global Secure Access connectivity were tested on 13 October 2026. Screenshots are taken from the test environment, with identifying information redacted where appropriate. Always confirm the current Microsoft requirements before deploying into production.
1. Prepare the Windows pilot
Use an Intune-enrolled Windows 11 x64 device joined or hybrid joined to Microsoft Entra ID, in a tenant onboarded to Global Secure Access. Windows on Arm needs a separate installer; this package is for x64. A merely Entra-registered device is unsuitable for this Microsoft traffic test. See the Windows client prerequisites.
You’ll also need:
- Microsoft Entra ID P1 or P2 for the pilot user’s Microsoft traffic profile, plus appropriate Intune licensing. Internet Access and Private Access have separate product licensing requirements; check the licensing comparison.
- Global Secure Access Administrator access. Microsoft’s assignment procedure also specifies Application Administrator access; use the roles required for your operation. You need permission to create groups and deploy Intune apps too.
- A pilot user with access to the Microsoft 365 workload you’ll test, such as Exchange Online.
- A way to administer the device if forwarding fails.
Create two security groups using your normal group-management process:
| Group | Membership | Purpose |
|---|---|---|
GSA-Pilot-Users |
Pilot users | Traffic forwarding scope |
GSA-Pilot-Devices |
Pilot devices | Intune application deployment |
These are separate controls. Installing the app on a device doesn’t assign a traffic profile. Assigning a profile to users doesn’t install the app.
The user group can cover other Windows devices those users use with the client. It does not mean “only devices in GSA-Pilot-Devices”. Check existing client installations before you enable forwarding.
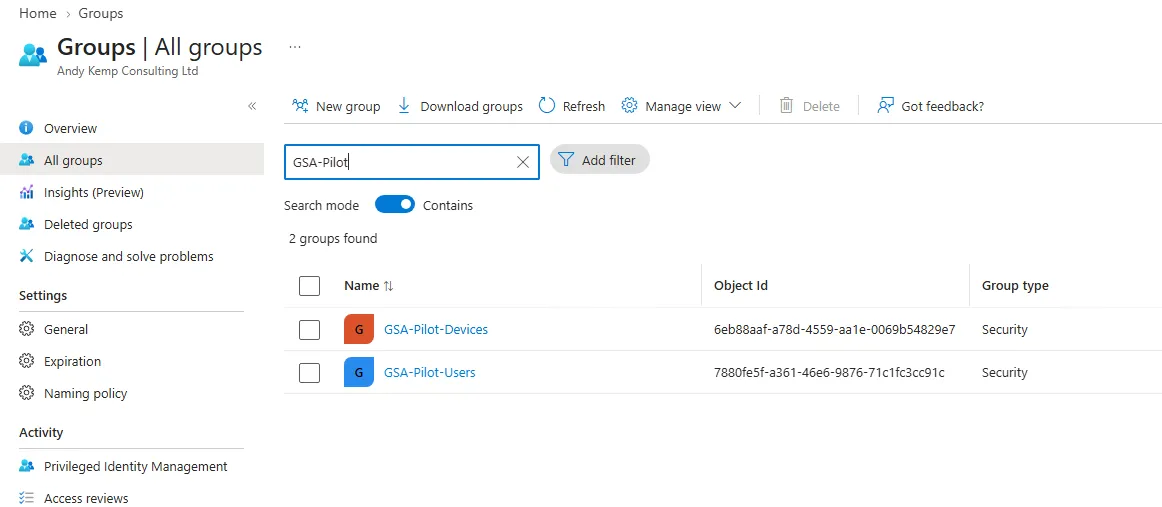
Figure 1: Microsoft Entra security groups created for the Global Secure Access pilot.
Before changing anything, record existing profile assignments and whether the profile is already enabled. Use that record for rollback.
2. Scope Microsoft traffic forwarding
The Microsoft profile covers defined Microsoft service endpoints, including Exchange Online, SharePoint, OneDrive and Teams. It’s a useful first test because it doesn’t require Private Access connectors. Review the Microsoft profile guidance.
Portal steps — unverified in a live tenant:
- Open the Microsoft Entra admin center and go to Global Secure Access > Connect > Traffic forwarding.
- Open the Microsoft traffic profile and review its policy groups. Ensure the workload you’ll test is enabled and its relevant rules forward traffic.
- Open Assignments. Next to User and device assignments, select View.
- Choose Selected users and devices, add
GSA-Pilot-Usersand save. - Next to Device platform assignments, select View, select Windows and save.
- Confirm the saved scope before enabling the profile. If it is already in production use, preserve existing assignments and coordinate any changes.
Avoid enabling an unreviewed profile with an all-users assignment. Check remote network assignments too: client assignments aren’t the only way a Microsoft profile can acquire traffic.
User/device scope and platform scope must both match. Profiles are fetched for the Entra user signed in to Windows, rather than simply the account displayed in the client. See assignment evaluation.
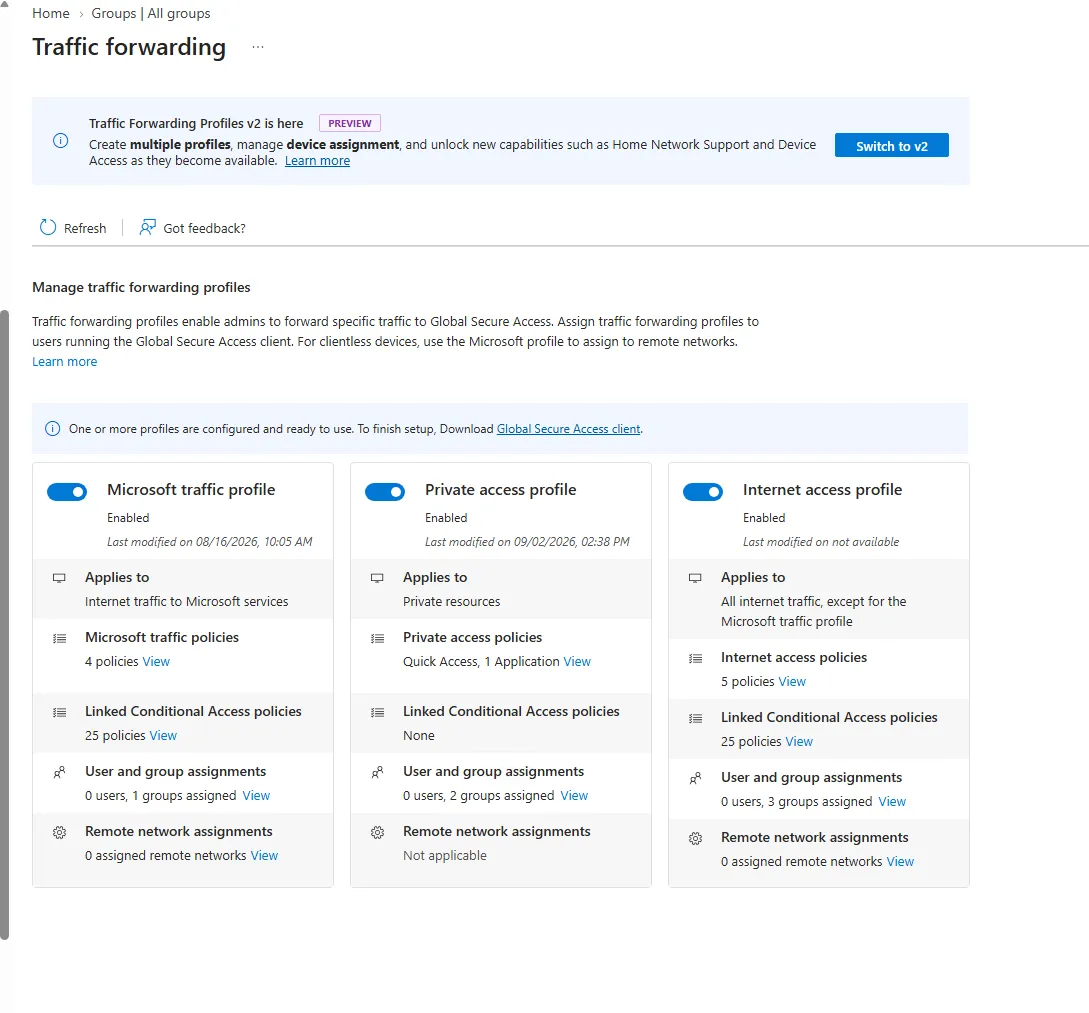
Figure 2: Global Secure Access traffic forwarding profiles in the Microsoft Entra admin center.
3. Download and package the installer
Portal step — unverified in a live tenant: In Entra, open Global Secure Access > Connect > Client download and download the x64 Windows installer.
Record the version and keep the original installer. Put it in C:\Packages\GSAClient as GlobalSecureAccessClient.exe.
Download the Microsoft Win32 Content Prep Tool. Keep the tool and output folder outside the source folder, because the tool packages the source folder’s contents.
Run this from the directory containing the tool:
.\IntuneWinAppUtil.exe -c C:\Packages\GSAClient -s GlobalSecureAccessClient.exe -o C:\Packages\Output -qThe output is the .intunewin file you’ll upload.
This guide packages the installer directly. Microsoft’s Intune example includes a wrapper that changes IPv4 preference and requests a restart. That networking change is omitted here; this isn’t a reproduction of that wrapper. Validate your network prerequisites and forwarding before expanding the pilot.
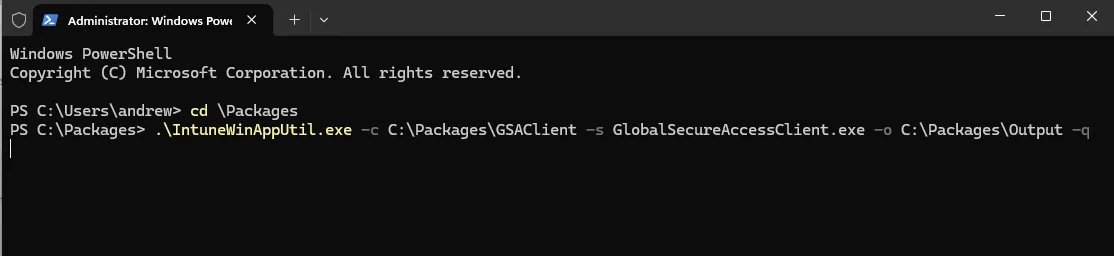
Figure 3a: Using the Microsoft Win32 Content Prep Tool to package the Global Secure Access Windows client.
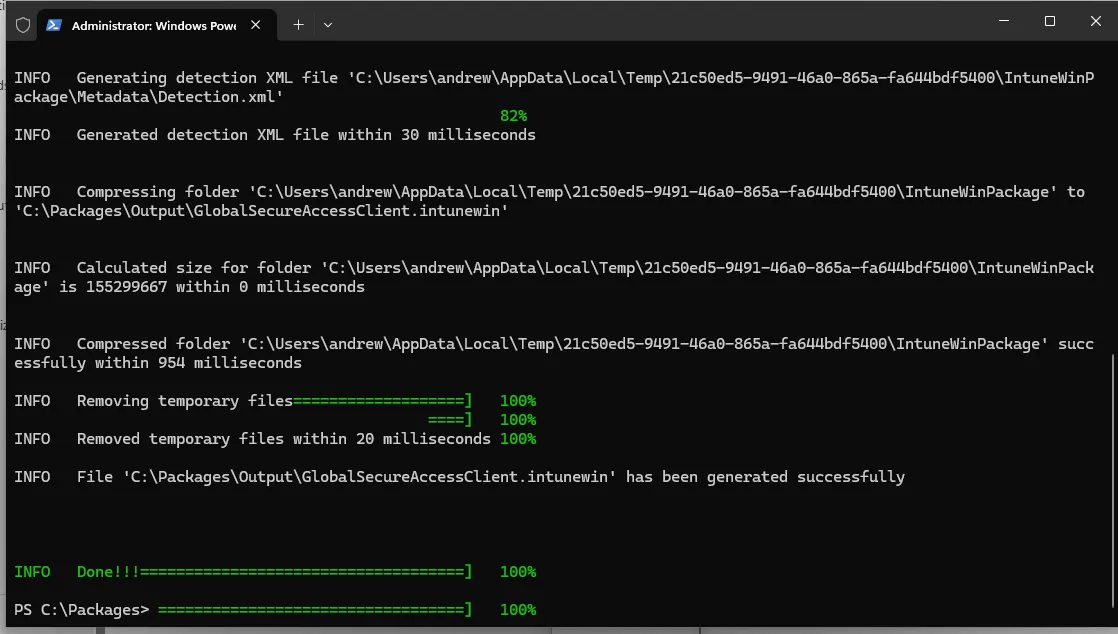
Figure 3b: The Microsoft Win32 Content Prep Tool successfully creates the Global Secure Access client package for Intune.
4. Create the Intune Win32 app
Create the Win32 application
With our .intunewin package ready, we can now create the application in Microsoft Intune.
- Open the Microsoft Intune admin center.
- Navigate to Apps > All apps.
- Select Create.
- Under Platform, select Windows.
- Under App type, select Windows app (Win32).
- Select Select to continue.
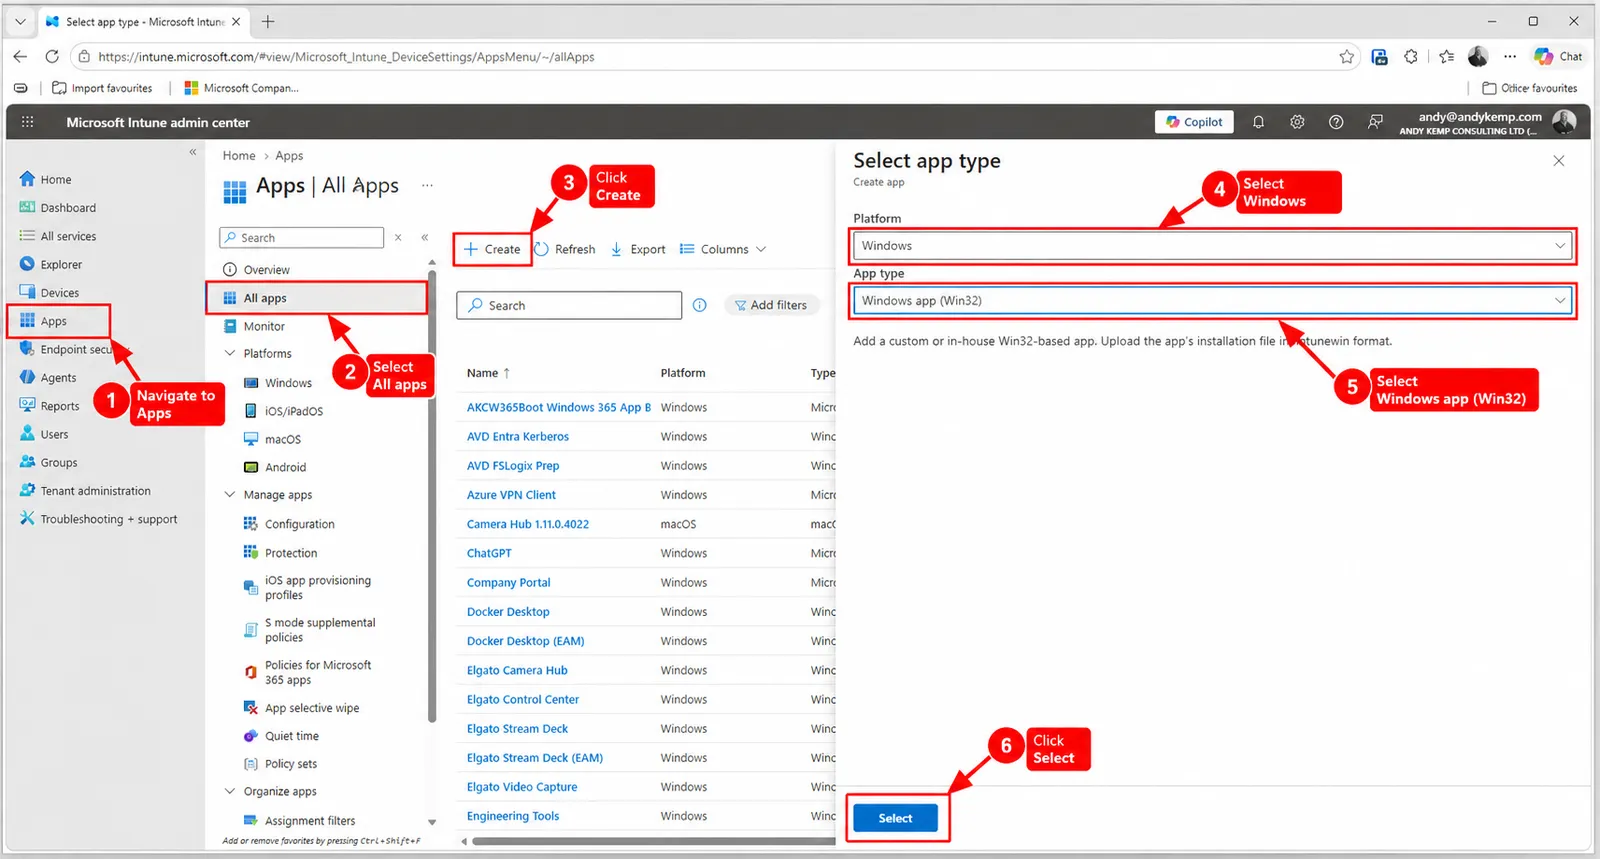
Figure 4a: Creating a new Windows Win32 application in Microsoft Intune.
Next, we need to upload the package we created earlier.
- Select the application package file.
- Browse to
GlobalSecureAccessClient.intunewin. - Confirm the package has been uploaded successfully.
- Select Next to configure the application.
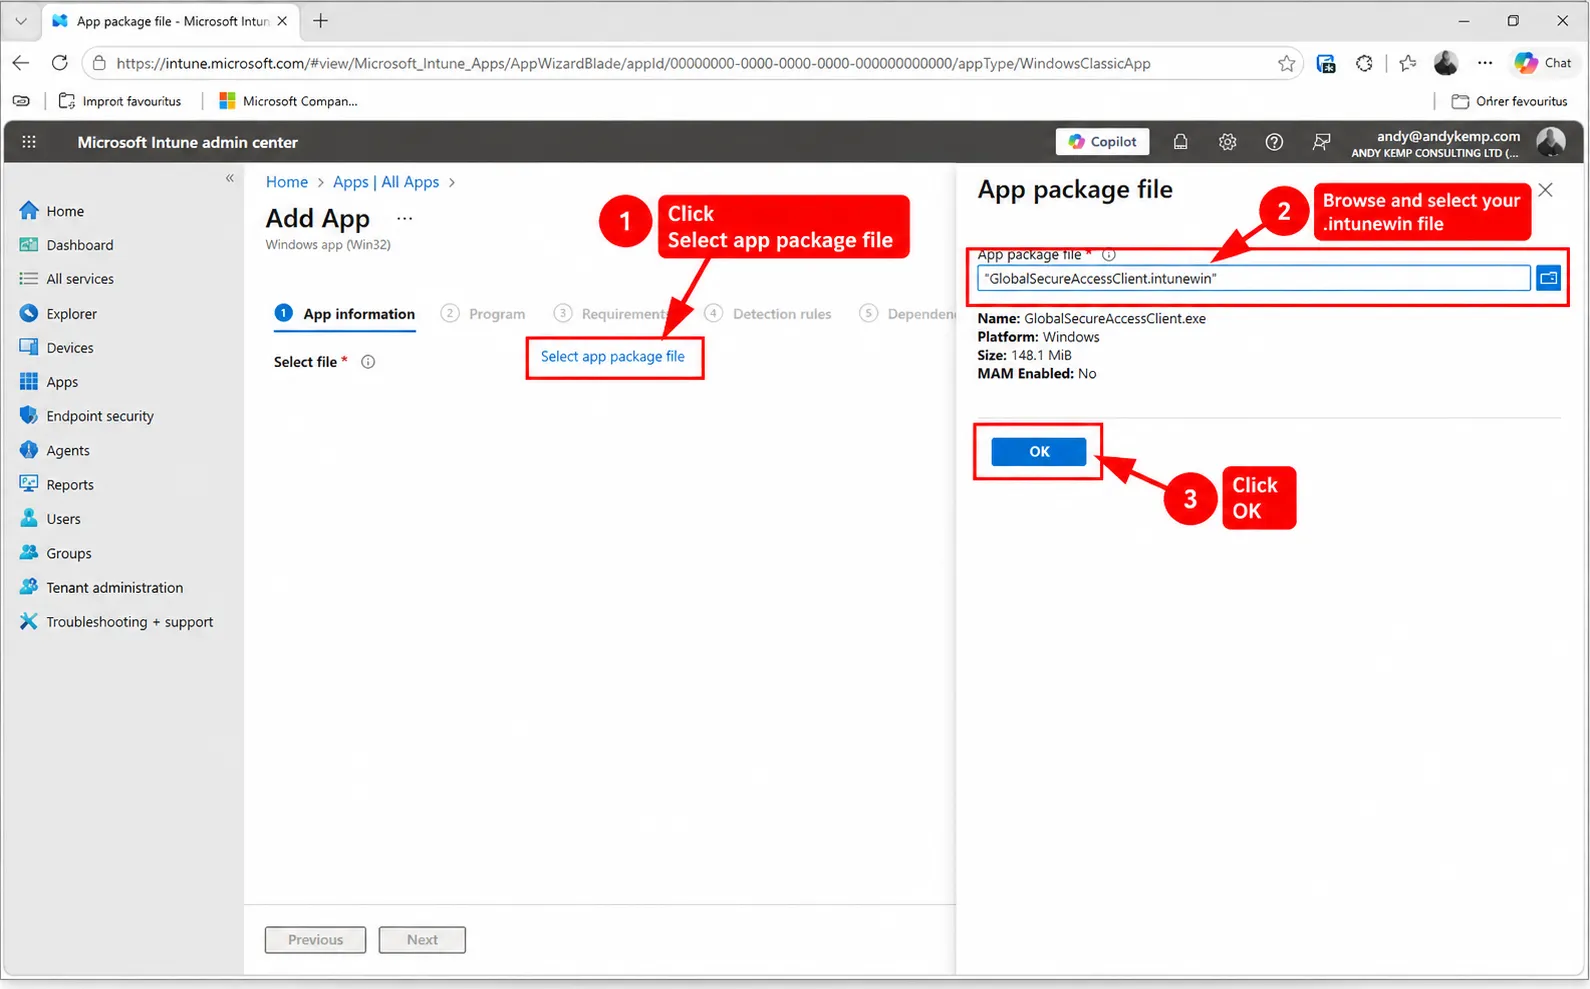
Figure 4b: Uploading the Global Secure Access client package.
Name it Global Secure Access Client – Windows x64, set Microsoft as publisher and record the packaged version. Follow the Win32 app creation guidance for the wizard.
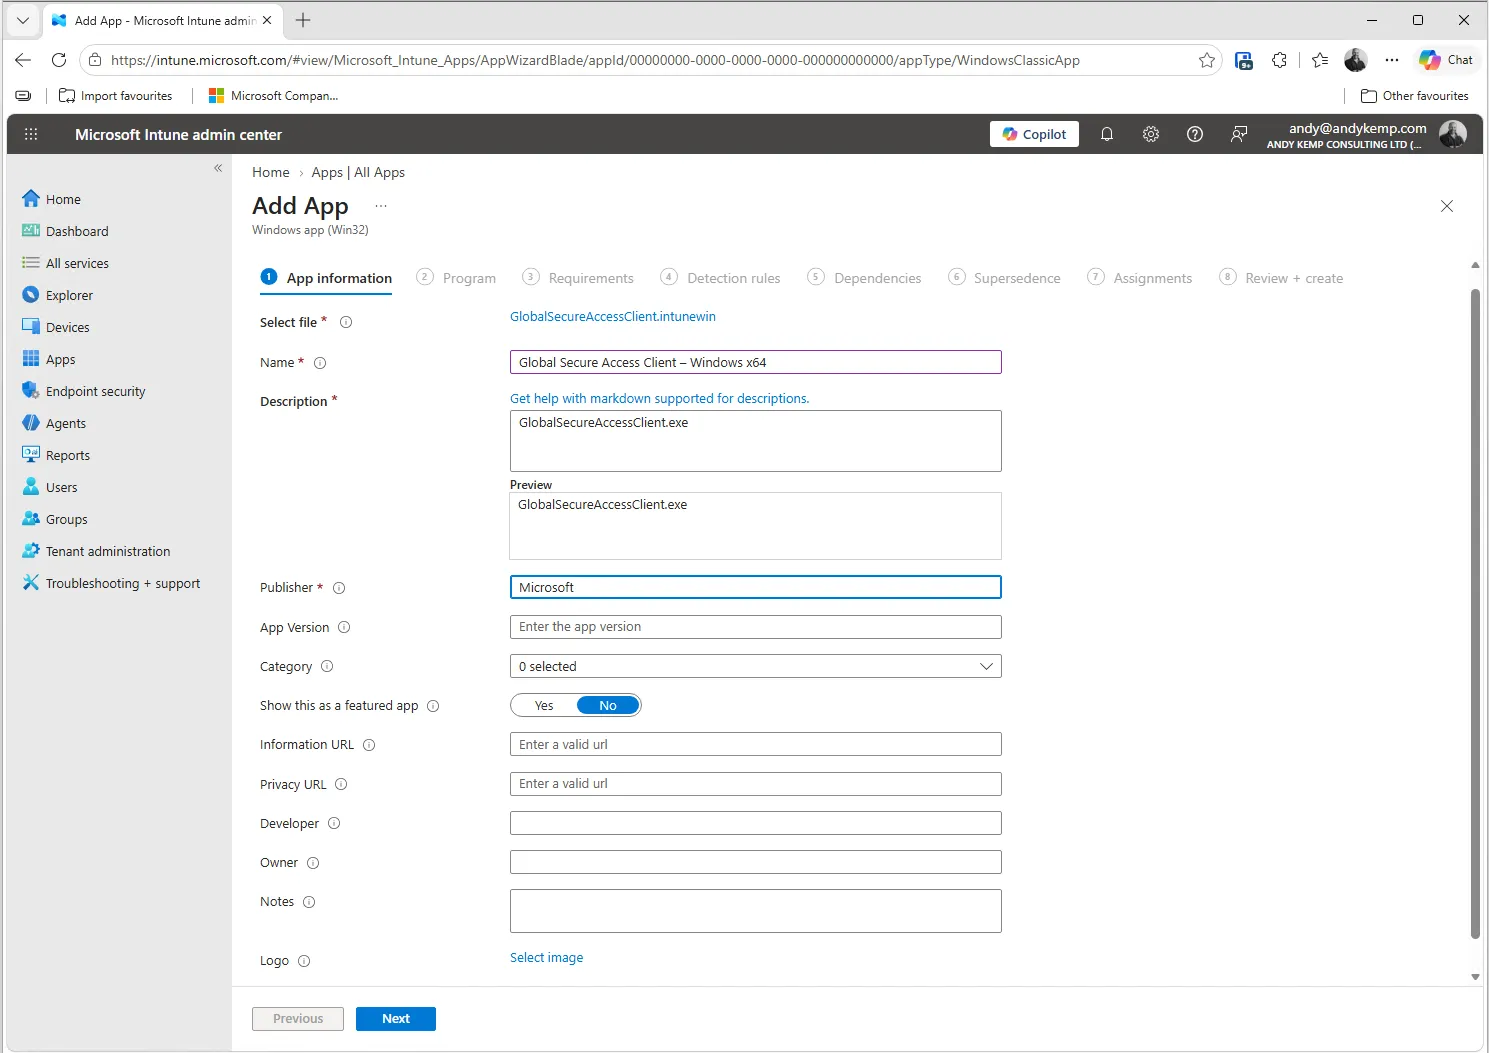
Figure 4c: Configuring the application name, description, publisher and version for the Global Secure Access Windows client.
Program and requirements
Use these commands, matching the filename inside your package:
Install:   GlobalSecureAccessClient.exe /quiet /norestart
Uninstall: GlobalSecureAccessClient.exe /uninstall /quiet /norestart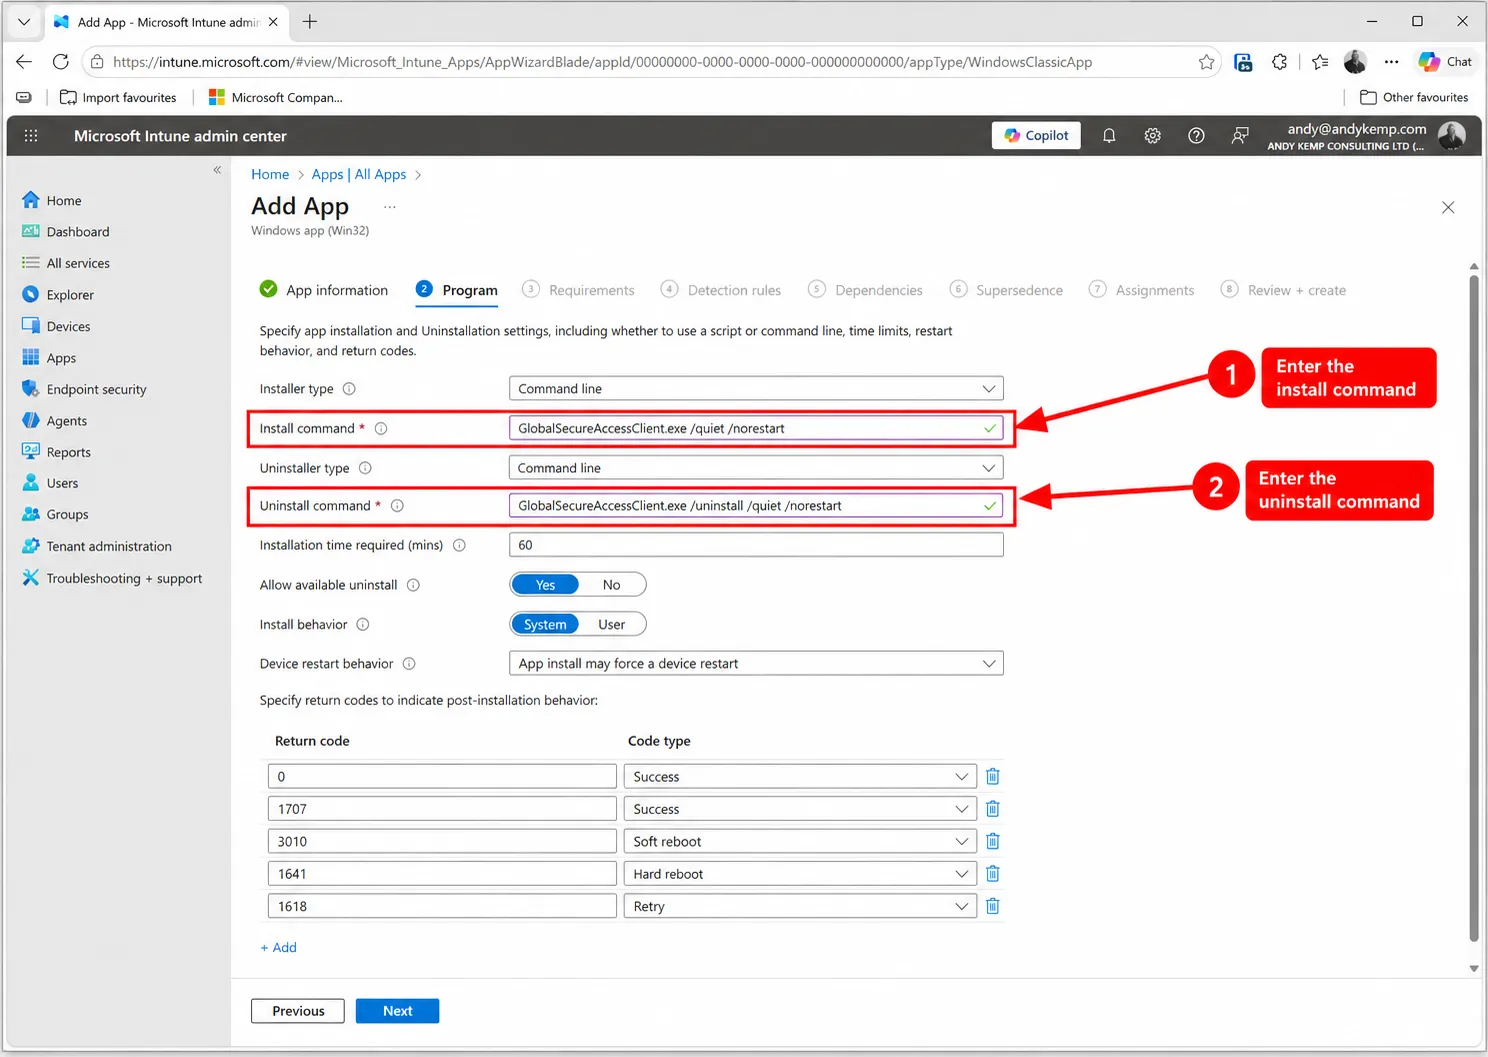
Figure 4d: Configuring the installation and uninstall commands for the Global Secure Access Windows client.
Use System installation and return-code-based restart handling: 0 = success, 3010 = soft reboot, 1618 = retry. Retain other applicable Intune defaults. Set x64 and your supported Windows 11 minimum as requirements. Configure a restart grace period where offered. These settings follow the Windows installation guidance.
/norestart prevents an installer-initiated restart; it doesn’t remove a restart requirement. Test the direct install and uninstall commands on the pilot, including Intune restart behaviour, before using them more widely.
Configure application requirements
Next, configure the requirements that devices must meet before Intune attempts to install the application.
For this example, we’re deploying the x64 version of the Global Secure Access client to Windows 11 devices.
Configure the following:
| Setting | Value |
|---|---|
| Check operating system architecture | Yes |
| Install on x64 system | Yes |
| Install on x86 system | No |
| Install on ARM64 system | No |
| Minimum operating system | Windows 11 22H2 |
The minimum operating system should reflect your organisation’s supported Windows baseline.
I’m using Windows 11 24H2 for this pilot, but this isn’t a universal requirement for Global Secure Access.
If you’re deploying to Windows on Arm, use the appropriate ARM64 client installer and configure a separate application deployment.
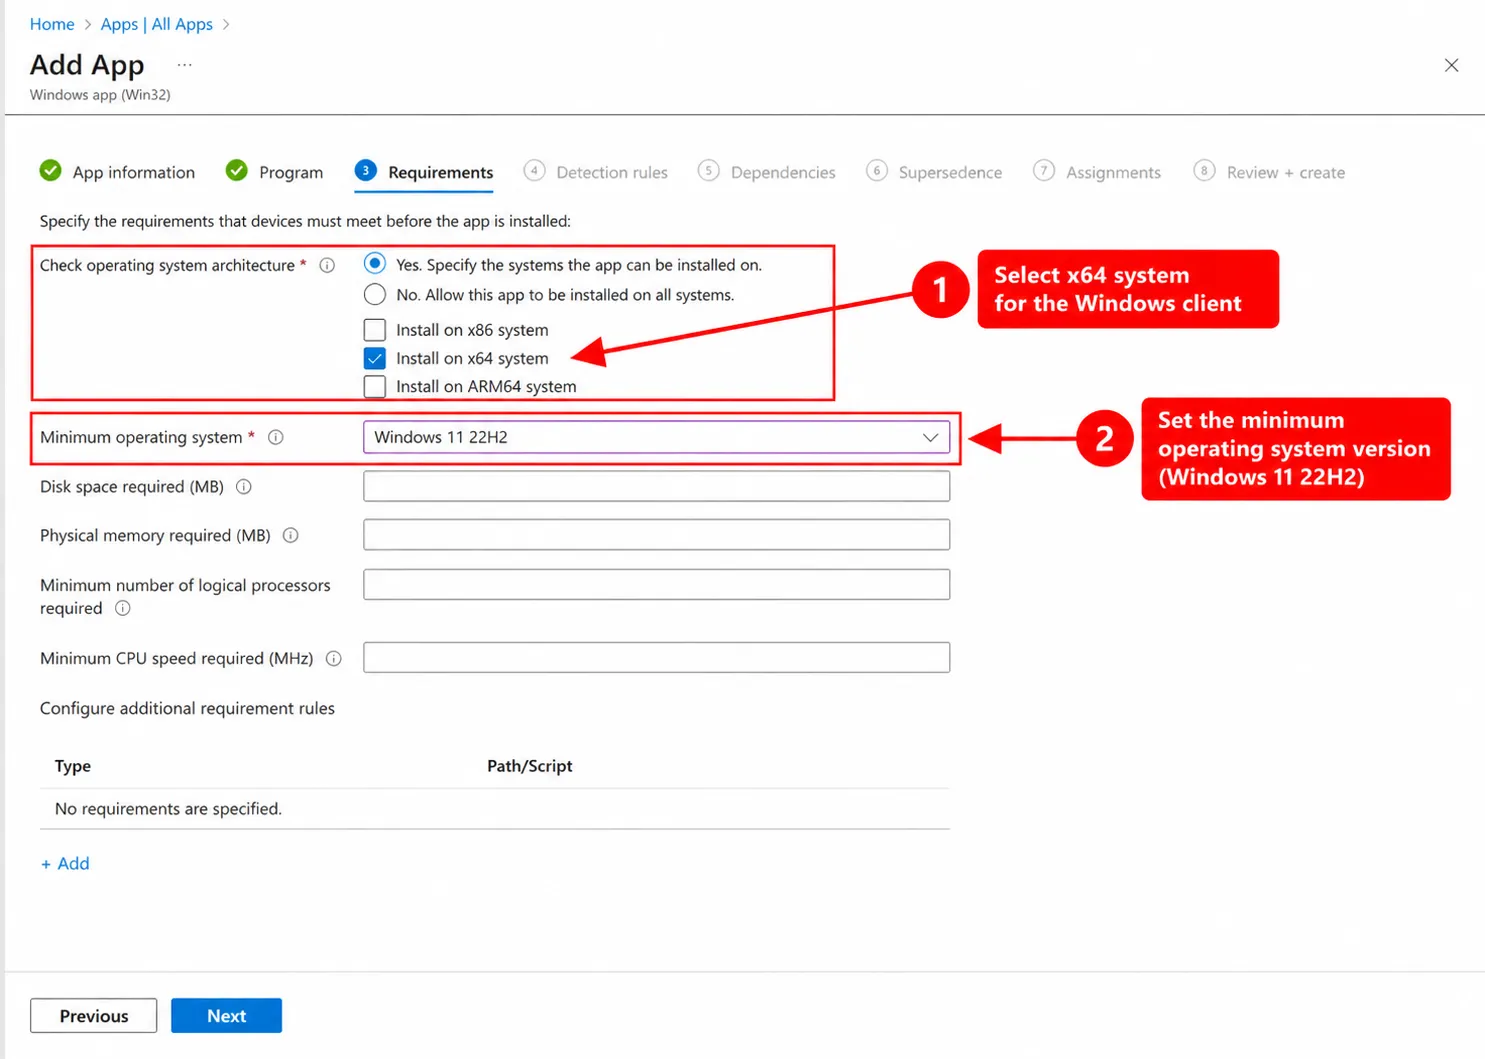
Figure 4e: Configuring the operating system and architecture requirements for the Global Secure Access Windows client.
Configure the detection rule
Next, we need to tell Intune how to determine whether the Global Secure Access client is installed.
For this deployment, we’re using a simple file-based detection rule.
Intune will check whether the Global Secure Access client executable exists in its expected installation directory.
- Under Rules format, select Manually configure detection rules.
- Select + Add.
- Under Rule type, select File.
- Configure the following settings:
| Setting | Value |
|---|---|
| Rule type | File |
| Path | C:\Program Files\Global Secure Access Client\TrayApp |
| File or folder | GlobalSecureAccessClient.exe |
| Detection method | File or folder exists |
| Associated with a 32-bit app on 64-bit clients | No |
- Select OK to save the detection rule.
- Select Next to continue.
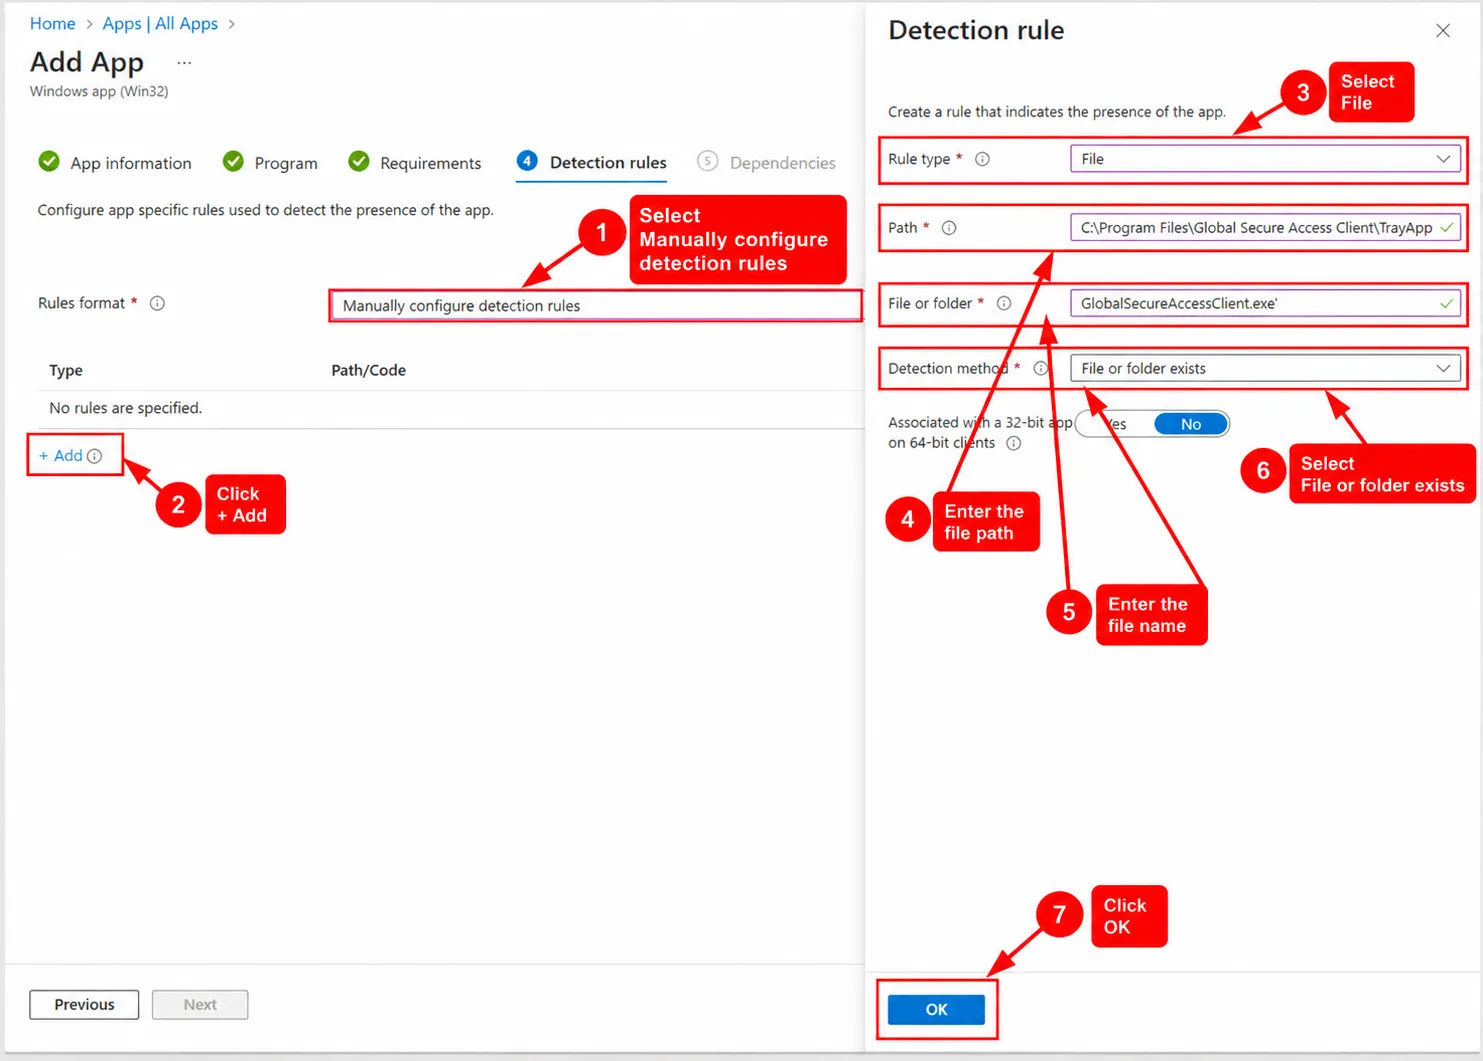
Figure 4f: Configuring a file-based detection rule for the Global Secure Access Windows client
Why use file-based detection?
For this initial deployment, we simply want Intune to confirm that the client executable is present.
This keeps the detection rule straightforward and avoids tying the deployment to a particular application version.
There is, however, an important limitation.
File existence doesn’t tell us which version of the client is installed, whether it’s connected or whether traffic is being forwarded correctly.
It also doesn’t guarantee that the installation is healthy.
We’ll verify client connectivity and traffic forwarding separately using Global Secure Access Advanced Diagnostics.
For production deployments, you may want to consider version-based detection as part of your wider application management strategy.
Remember, neither detection method automatically keeps the application updated. Client updates require a separate management process.
Dependencies and Supersedence
The next two steps in the Intune application wizard are Dependencies and Supersedence.
For this deployment, we don’t need to configure either.
Dependencies allow us to specify applications that must be installed before the Global Secure Access client. As we’re deploying the client independently, no additional application dependencies are required.
Supersedence allows us to replace or upgrade an existing application deployment. As this is our initial deployment, there’s no previous application package to supersede.
- On the Dependencies page, leave the configuration empty and select Next.
- On the Supersedence page, leave the configuration empty and select Next.
We’ll revisit supersedence when we look at managing client updates and application lifecycle management later in the series.
For now, we can move straight to Assignments, where we’ll target our pilot devices.
Assign the application to the pilot devices
With the application configured, we now need to tell Intune which devices should receive the Global Secure Access client.
For this deployment, we’ll use the GSA-Pilot-Devices security group we created earlier.
- On the Assignments page, locate the Required section.
- Select + Add group.
- Search for and select
GSA-Pilot-Devices. - Confirm the group appears under Required with its status set to Active.
- Leave Available for enrolled devices and Uninstall without assignments.
- Select Next to continue.
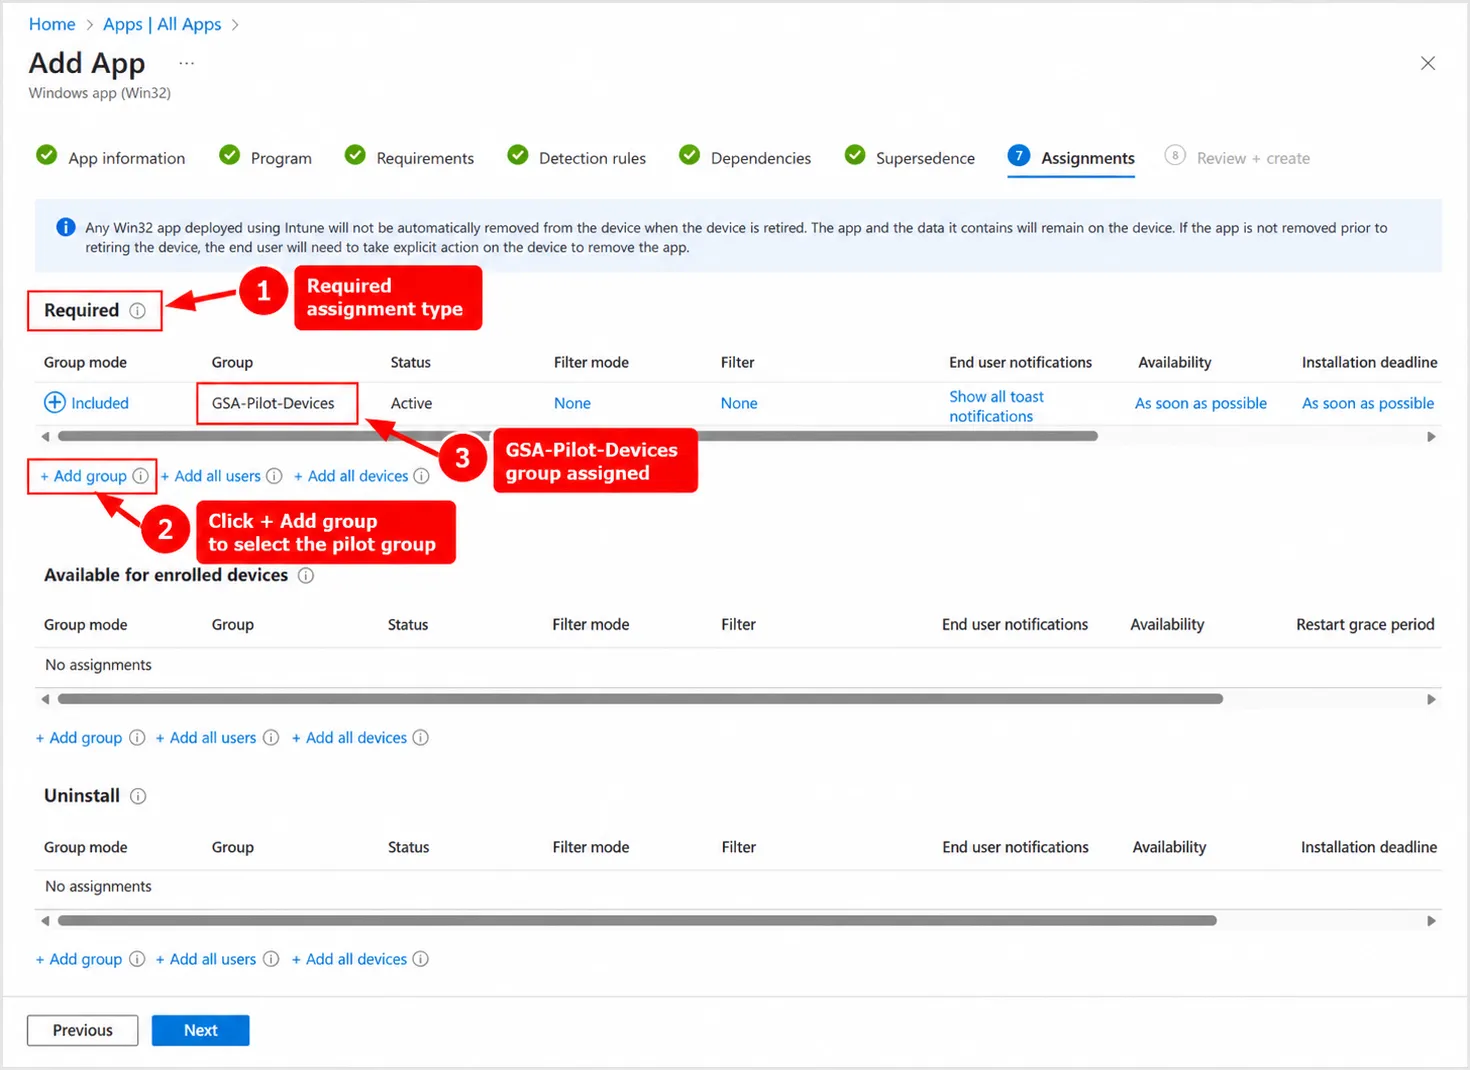
Figure 4g: Assigning the Global Secure Access Windows client to the GSA-Pilot-Devices security group.
By assigning the application as Required, Intune will automatically attempt to install the client on devices belonging to the pilot group.
This is different from making the application available through Company Portal, where users would need to initiate the installation themselves.
For our pilot, we want the deployment to happen automatically without requiring user interaction.
Review and create
On the Review + create page, check the application settings, particularly the installation commands, detection rule and group assignment.
Once you’re happy with the configuration, select Create.
Intune will upload the application package and create the deployment.
We’ll now move to our pilot Windows device to confirm the application installs successfully.
Deployment and automatic updates are different
A Win32 assignment deploys the version you packaged. Changing the app’s version label alone doesn’t update its contents.
As of 13 October 2026, Microsoft documents Windows Update upgrades starting in November 2026, for x64 client version 2.31.125 or later and Arm client version 2.32.294 or later. This is a separate servicing mechanism, not a benefit provided by .intunewin packaging. Don’t describe it as already active on this article’s documentation-check date.
The Windows release notes document an installer opt-out, EnableWindowsUpdates=0. This guide leaves that setting at its default. If you choose to opt out, you take responsibility for deploying updates yourself. Confirm the current release notes and your organisation’s servicing policy before rollout; a detailed update strategy belongs in a later article.
5. Prove That Global Secure Access Is Working
We’ve packaged the Global Secure Access client, configured the deployment in Intune and assigned it to our pilot devices.
Now comes the important part.
Did it actually work?
There are several things we need to establish before calling this deployment successful.
First, did Intune install the application? Second, has the client connected to Global Secure Access? And finally, is the traffic we expect actually being forwarded?
These are three different questions, and a successful result for one doesn’t necessarily mean the others are working.
Let’s work through them.
5.1 Confirm the Client Has Been Installed
Once Intune processes the application assignment, it should begin downloading and installing the Global Secure Access client.
Depending on your notification settings, you may see a Windows notification confirming that the installation is underway.
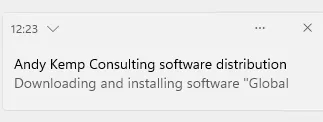
Figure 5a: Microsoft Intune downloading and installing the Global Secure Access Windows client.
We can also check the installation status directly in Intune.
- Open the Microsoft Intune admin center.
- Navigate to Apps > All apps.
- Open the Global Secure Access Client – Windows x64 application.
- Under Monitor, select Device install status.
- Locate your pilot device and check its installation status.
We want to see the device reporting Installed.
Remember, we’re using a file-based detection rule. This confirms that Intune has detected the client executable in its expected location.
It doesn’t tell us whether the client is connected or functioning correctly.
5.2 Check the Client Connection
Once installation has completed, the Global Secure Access icon should appear in the Windows system tray.
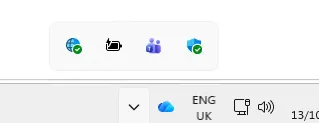
Figure 5b: The Global Secure Access client appearing in the Windows system tray following installation.
Open the client to check its connection status.
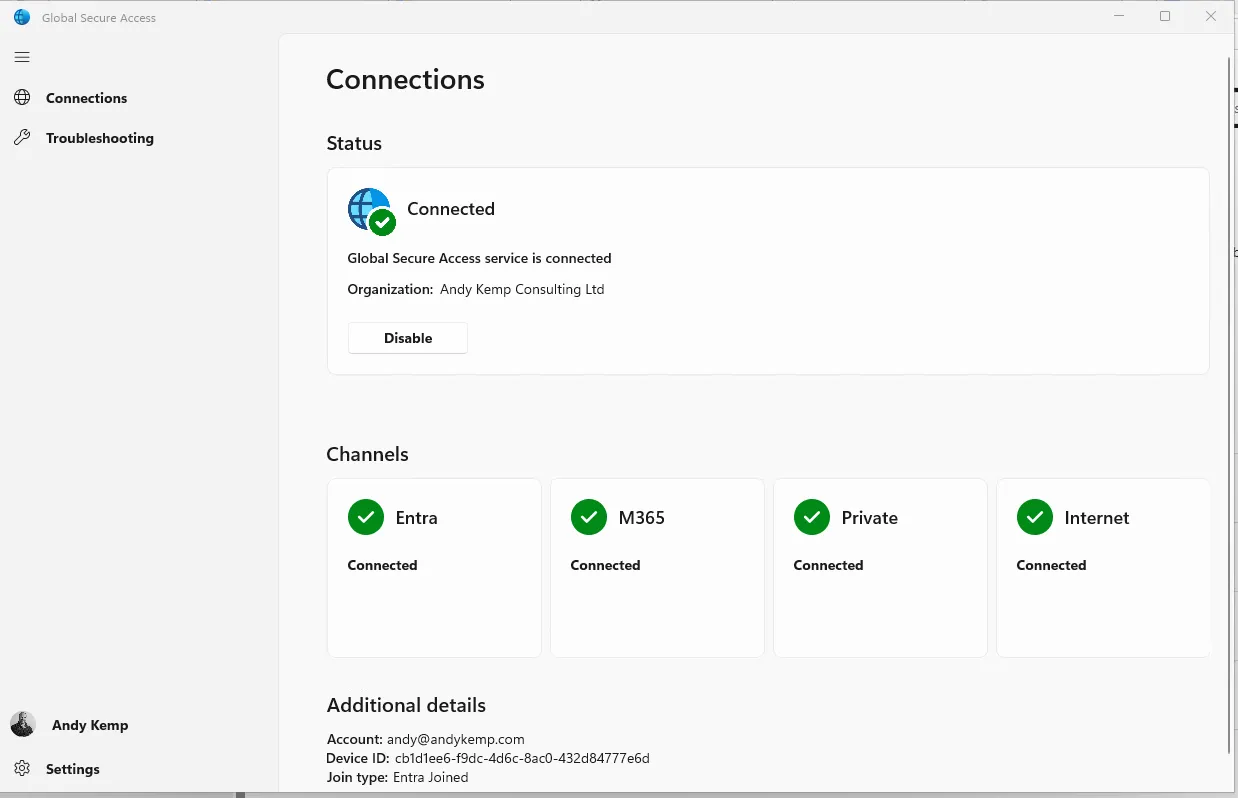
Figure 5c: Global Secure Access reporting a successful connection to the configured traffic channels.
In my test environment, the client reports Connected, with four channels available:
| Channel | Status |
|---|---|
| Entra | Connected |
| Microsoft 365 | Connected |
| Private Access | Connected |
| Internet Access | Connected |
My test tenant already has all three traffic forwarding profiles configured, which is why the corresponding channels are connected.
For this guide, we’re concentrating on Microsoft 365 traffic. You don’t need to enable Internet Access or Private Access simply to follow this initial deployment.
At this point, we know the client is installed and has established its connections.
But here’s the important distinction.
A green icon doesn’t mean every connection is being forwarded through Global Secure Access.
It tells us the client is connected. We still need to establish whether it’s receiving the expected forwarding configuration and acquiring the traffic we’ve designed it to handle.
5.3 Check Advanced Diagnostics
This is where Global Secure Access becomes particularly interesting.
The Windows client includes Advanced Diagnostics, which provides considerably more information than the connection status shown in the main interface.
We can use it to understand the client’s health, the forwarding configuration it has received and what happens to individual connections.
Open Advanced diagnostics from the Global Secure Access system tray menu or through the client’s Troubleshooting section.
Depending on the operation and your device configuration, you may be prompted to elevate.
Check the overview
Start with Overview.
Check that the client is associated with the expected tenant and user, and review the client version and available configuration information.
This helps establish that we’re testing the correct device and identity.
Run the health checks
Next, open Health check.
Review the results and investigate any failures relevant to the traffic we’re testing.
A failed health check doesn’t always mean the entire client is unusable, but it may explain why a particular forwarding scenario isn’t behaving as expected.
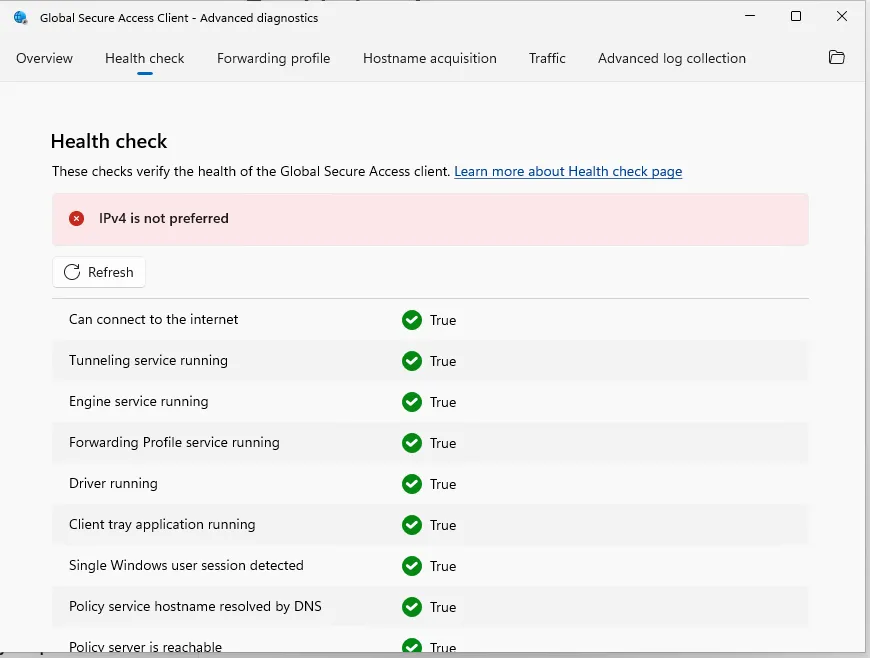
Figure 6: Reviewing the Global Secure Access client information and health checks using Advanced Diagnostics.
Understanding the IPv4 Preference Warning
You may notice that Advanced Diagnostics reports the following warning:
IPv4 is not preferred
This is something worth understanding rather than simply ignoring.
Global Secure Access currently has limitations around IPv6 traffic acquisition. Microsoft recommends configuring Windows to prefer IPv4 over IPv6 to help ensure that supported traffic is acquired correctly.
In this deployment, we deliberately kept the client installation separate from changes to the Windows networking configuration.
As a result, the health check reports that IPv4 isn’t preferred.
This warning doesn’t necessarily mean the client has failed to connect or that all traffic forwarding is broken.
As shown in Figure 6, the client services are running, and the other visible health checks are passing.
However, we shouldn’t assume that all traffic is being forwarded correctly simply because the client reports Connected.
We’ll use Advanced Diagnostics to verify the actual traffic behaviour in the next steps.
For a production deployment, IPv4 preference should be reviewed and configured in accordance with Microsoft’s current Global Secure Access client guidance.
Importantly, preferring IPv4 doesn’t mean disabling IPv6. These are different configuration changes.
Check the forwarding profile
Next, open Forwarding profile.
This shows the traffic forwarding rules available to the client.
For our pilot, we’re interested in the Microsoft traffic profile.
Review the rules and confirm that the expected Microsoft 365 destinations are present.
Depending on the rule, you’ll be able to examine information such as the destination, protocol, port and forwarding action.
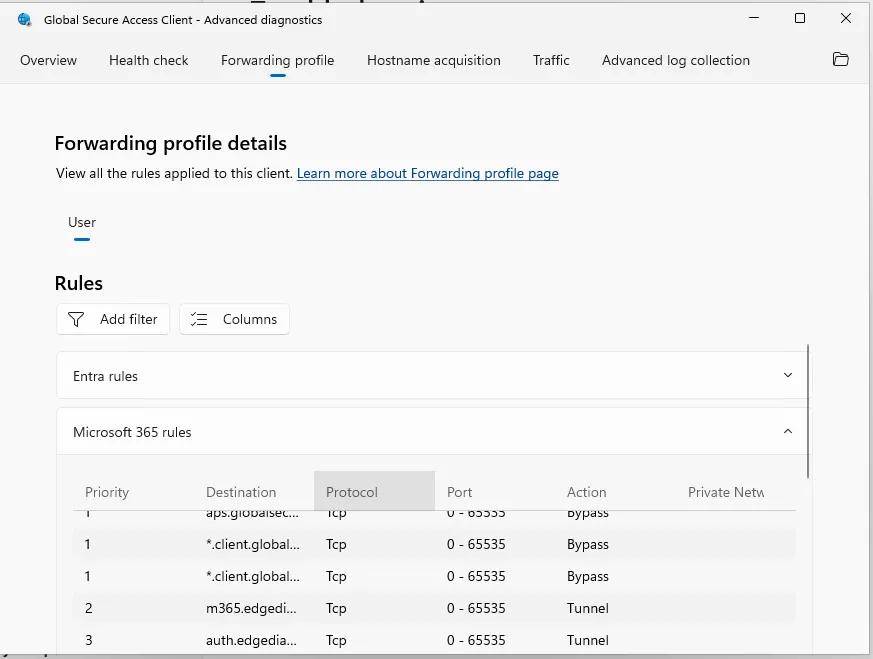
Figure 7: Reviewing the Microsoft 365 traffic forwarding rules received by the Global Secure Access client.
Notice that some rules have an action of Bypass, while others are configured for Tunnel.
This is expected behaviour. Global Secure Access doesn’t necessarily tunnel every connection, even when the Microsoft traffic profile is enabled.
The forwarding rules determine which traffic is acquired and which traffic should bypass the service.
At this stage, we’ve confirmed that the client has received its forwarding configuration.
Next, we need to prove that an actual connection matches the expected rule and is forwarded accordingly.
This is an important step.
If the client hasn’t received the expected rules, there’s little point troubleshooting why a particular connection isn’t being tunnelled.
We need to establish that the forwarding configuration is present before testing how traffic behaves.
A note about Refresh details: This refreshes the diagnostic information being displayed. It shouldn’t be treated as proof that the client has downloaded a new forwarding policy.
For more information about the available diagnostic information, see the Microsoft Advanced Diagnostics documentation.
5.4 Test Actual Traffic Forwarding
Now we’ve reached the part that matters most.
We’ve confirmed that the client is installed, connected and has received its forwarding configuration.
Let’s see what happens to some actual traffic.
For this test, we’re going to use Outlook on the web.
- In Advanced Diagnostics, open the Traffic tab.
- Start collecting traffic.
- Open a fresh browser session.
- Navigate to https://outlook.office.com.
- Sign in using your pilot account if required.
- Return to Advanced Diagnostics and stop collecting traffic.
You should now have a collection of connections generated during the test.
Find a connection associated with the Microsoft 365 destination we’re testing.
Review the available details, particularly:
| Field | What we’re checking |
|---|---|
| Destination | The Microsoft 365 endpoint being accessed |
| Process | The application responsible for the connection |
| Forwarding rule | The rule that matched the connection |
| Channel | The traffic forwarding channel used |
| Action | Whether the connection was tunnelled or bypassed |
For a connection matching our Microsoft traffic forwarding configuration, we want to see the appropriate Microsoft 365 channel and a Tunnel action.
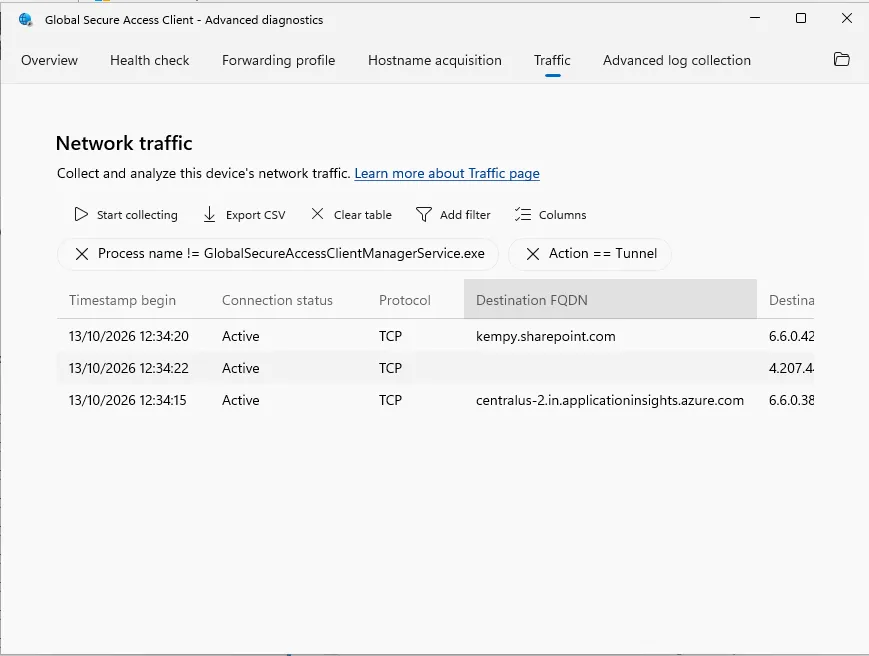
Figure 8: Advanced Diagnostics showing Microsoft 365 traffic being forwarded through Global Secure Access.
If the connection shows Bypass, that doesn’t automatically mean something is broken.
Some traffic is intentionally excluded from forwarding, and the browser may establish several connections to supporting services while loading a single page.
The important thing is understanding which rule matched the connection and why that action was taken.
We’ll explore that in much greater detail in Part 2.
For now, we’re looking for evidence that traffic matching our Microsoft forwarding configuration is actually being acquired and tunnelled.
And that’s a much stronger test than simply opening Outlook and confirming that the page loads.
5.5 Check the Global Secure Access Traffic Logs
We’ve now observed the connection from the Windows client.
As a final check, let’s see what Global Secure Access recorded on the service side.
- Open the Microsoft Entra admin center.
- Navigate to Global Secure Access > Monitor > Traffic logs.
- Filter the results to your pilot user.
- Narrow the time range to when you performed the test.
- Look for the relevant Microsoft 365 destination.
Allow for a delay between generating traffic and the corresponding records becoming available.
Figure 9: Reviewing the Global Secure Access traffic logs for the pilot user’s Microsoft 365 connection.
Where the available fields allow it, compare the destination, user, timestamp and correlation information with the connection captured in Advanced Diagnostics.
It’s worth remembering that the client-side Tunnel action and a service-side Allowed result describe different things.
The first tells us how the client handled the connection. The second describes how the service handled the request.
Together, they can provide useful evidence of the traffic path and the resulting access decision.
The availability and detail of traffic logs may vary depending on the service capabilities, licensing and permissions in your tenant. See the Microsoft traffic logs documentation for further information.
5.6 What Have We Actually Proven?
Let’s bring everything together.
| Check | What we’ve established |
|---|---|
| Intune installation status | The application satisfies our deployment detection rule |
| GSA client connected | The client has established its service connection |
| Client health checks | The relevant client health checks have been reviewed |
| Forwarding profile | The expected Microsoft traffic rules are available |
| Traffic diagnostics | A matching Microsoft 365 connection is being tunnelled |
| Service-side logs | Global Secure Access has recorded the relevant traffic, where available |
That’s the evidence I want before expanding a deployment beyond a small pilot.
It doesn’t mean we’ve tested every application, every destination or every security policy.
And it certainly doesn’t mean that enabling Global Secure Access automatically makes an environment secure.
What we’ve demonstrated is that our initial client deployment is working for the traffic we’ve tested.
We can now build on that foundation.
Configuration is not evidence. We’ve configured the client, tested it and examined the results.
6. Troubleshooting and rollback
Work from the failed stage instead of reinstalling immediately.
| Symptom | First checks |
|---|---|
| Installation fails | Intune error, architecture, requirements, installer exit code and restart state. |
| Installed but disconnected | Sign-in, device join, health checks and service connectivity. |
| Expected rules missing | Profile enabled, Windows/user scope, signed-in Windows identity and last profile check. |
| Test traffic bypasses | Actual destination/protocol/port, matching rule and intentional bypasses. |
| Works on one network only | Existing VPN, proxy, DNS settings and network restrictions. |
| No matching portal record | Test time, filters, permissions and log delay; repeat with a new connection. |
For installation failures, consult the Windows troubleshooting guide for installer logs and Windows event logs. Collect diagnostics while reproducing a persistent problem before opening a support case.
Review current Windows limitations if acquisition fails. Secure DNS and IPv6 behaviour can affect results. QUIC restrictions also matter when extending testing to Internet Access. Keeping hardening out of Part 1 doesn’t make those limitations disappear: resolve the relevant prerequisite on your pilot and repeat the test before declaring success.
Roll back the pilot
- Capture the error and diagnostic evidence while the problem is present.
- Check whether existing Conditional Access policies require the GSA path. Removing forwarding or uninstalling could leave the user unable to access resources; arrange an approved recovery path first.
- Restore the pilot’s previous traffic-profile scope. In a shared tenant, avoid disabling a profile used by other users or remote networks. Allow policy refresh and verify the device’s effective rules.
- Remove the pilot device’s Required app assignment and check other assignments that could reinstall it.
- If removing the client, add an Uninstall assignment for the pilot device group. Use the uninstall command already tested for this package. Restart if required and confirm removal locally and in Intune.
- Retest Microsoft 365 access, normal connectivity and device management.
Removing a Required assignment doesn’t uninstall an existing application. Deleting the app record isn’t a rollback either. Keep the package and app available until you’ve confirmed the result.
This procedure rolls back the pilot deployment. It isn’t an instruction to downgrade the client. Review release guidance and support advice before attempting a version rollback.
Once this small pilot behaves as expected, expand it gradually. Part 2 will look more closely at Advanced Diagnostics and explain how to trace where traffic goes and why.
References
- Install the Global Secure Access client for Windows
- Global Secure Access overview and licensing
- Manage the Microsoft traffic forwarding profile
- Assign users and devices to forwarding profiles
- Microsoft Win32 Content Prep Tool
- Add and assign Win32 apps in Intune
- Windows client release notes and automatic upgrades
- Advanced diagnostics for the Windows client
- Global Secure Access traffic logs
- Troubleshoot Windows client issues
- Current known limitations
Comments
No comments yet — be the first to leave one below.