
Block a website with Global Secure Access and you might expect a friendly page explaining why. What most people get first is a browser error: connection reset.
That isn’t a fault. Without TLS inspection, Global Secure Access can see which site the user is going to, but not inside the encrypted connection. It can’t put a page into that connection, so all it can do is drop it.
In Part 1, we deployed the client. In Part 2, we used Advanced Diagnostics to see where traffic goes. In Part 3, we sent one application through a private network connector. Part 4 goes back to Internet Access and turns that connection reset into a block page users can understand. To get there, we enable TLS inspection properly.
By the end, a pilot group will have:
- a trusted inspection certificate deployed through Intune before anything is switched on
- a TLS inspection policy, scoped to the pilot through a security profile and Conditional Access
- QUIC blocked, so browsers can’t go around the inspection
- a custom block page, and evidence that it appears
Lab status: The steps below are being recorded in my lab, and figures are added as each stage is captured. Where a result hasn’t been captured yet, I say so rather than describe what should happen. Microsoft documentation was checked on 26 October 2026. The Microsoft-managed certificate is still in preview, so confirm current behaviour and portal labels when you follow along.
1. Understand why the block page needs TLS inspection
Without TLS inspection, Global Secure Access sees two things about an HTTPS connection:
- the destination IP address
- the server name in the TLS handshake (the SNI), such as
www.example.com
That’s enough to block a whole site. It isn’t enough to see the path, such as /shorts, or anything inside the request. Because the service can’t write into an encrypted stream it isn’t part of, blocking means dropping the connection. The browser reports that as connection reset. Microsoft documents this behaviour in its web content filtering tutorial.
This is what my lab showed before TLS inspection, with a gambling category blocked:
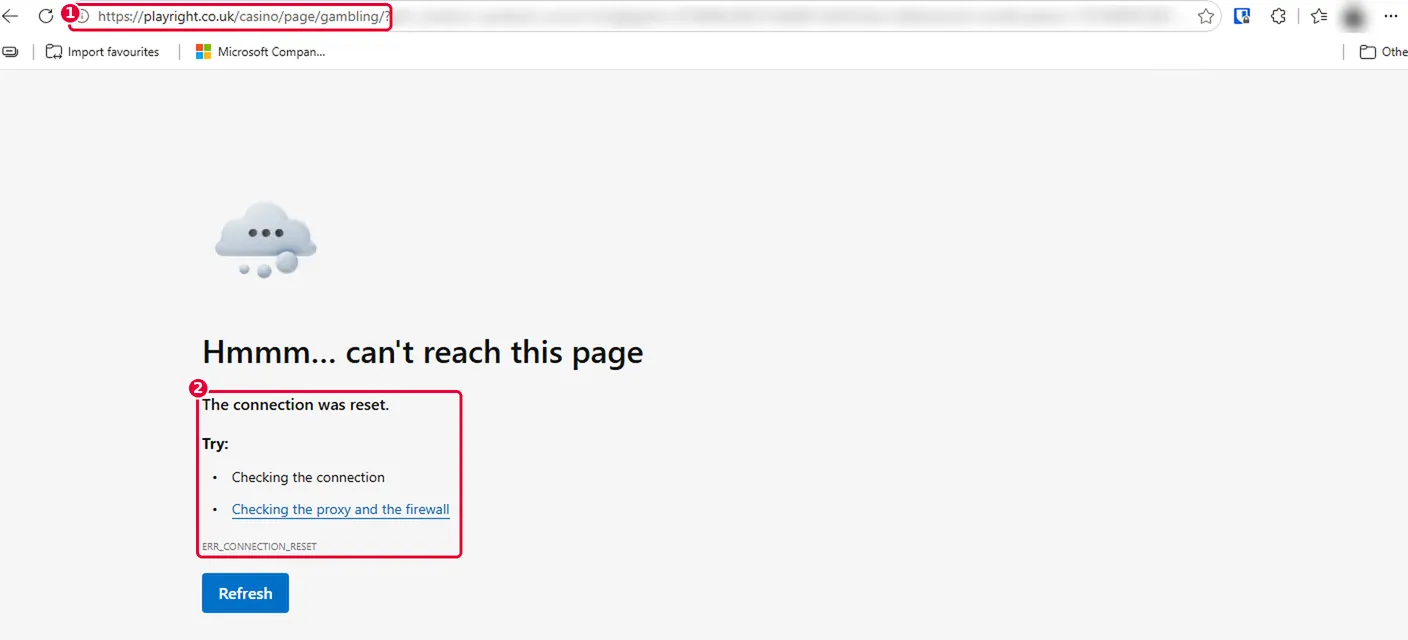
Figure 1: Before TLS inspection, over HTTPS. ① A blocked gambling site. ② Edge reports The connection was reset (
ERR_CONNECTION_RESET). Global Secure Access dropped the connection because it can’t put a page inside encrypted traffic it isn’t decrypting.
In an InPrivate window with HTTPS-first switched on, Edge shows something different. It treats the dropped connection as the site not supporting HTTPS and offers to fall back to plain HTTP.
Let the browser fall back to plain HTTP, and the block page does appear:
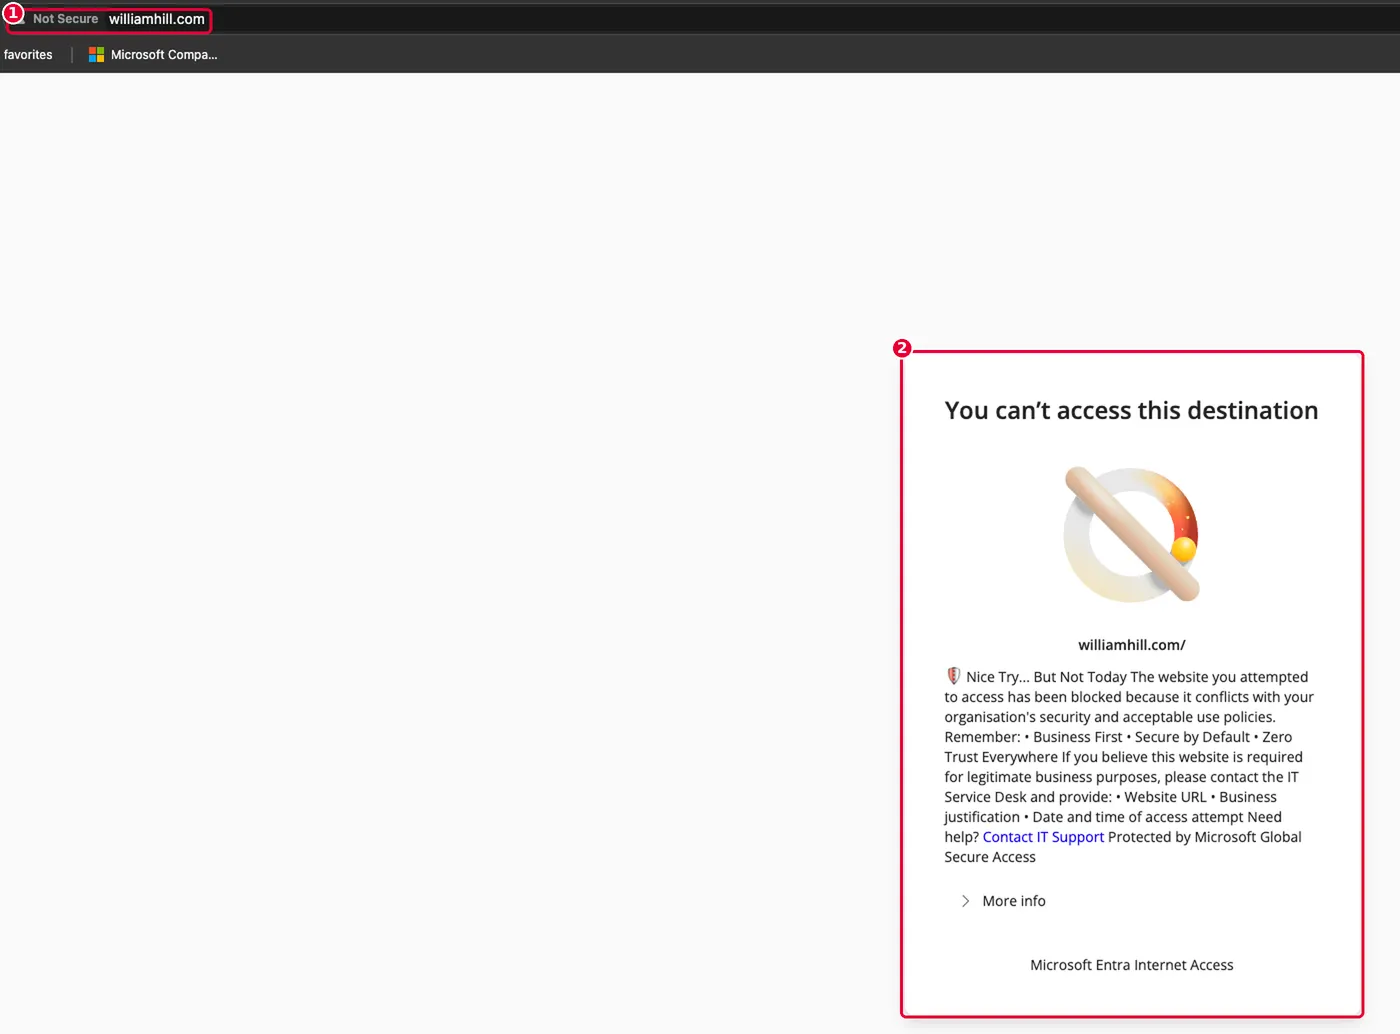
Figure 2: The same policy over plain HTTP. ① The address bar shows Not Secure. ② Because HTTP isn’t encrypted, Global Secure Access can return its block page, here with my custom message.
That’s the problem in two screenshots. Microsoft’s block page guidance says custom pages appear for TLS-inspected traffic. In my lab, they also appeared for plain HTTP, which makes sense because there’s nothing to decrypt. Almost nothing is plain HTTP any more, though. For the HTTPS traffic users actually generate, the block page needs TLS inspection.
With TLS inspection, the service ends the encrypted session at its edge, checks the traffic against policy, and starts a new encrypted session to the website. Because it now holds the session, it can return a page. Microsoft is explicit that custom block pages appear for TLS-inspected traffic only.
| Without TLS inspection | With TLS inspection | |
|---|---|---|
| Block a whole site (FQDN) | Yes | Yes |
| Block a path (URL filtering) | No | Yes |
| What the user sees | Connection reset | Your block page |
| Device must trust a GSA certificate | No | Yes |
That last row is why this isn’t a switch to flip casually. In Entra Internet Access: Moving Web Security to the Identity Layer, I argued TLS inspection should start from a requirement rather than from “there’s a switch, let’s turn it on”. In Global Secure Access Alongside Your Existing Security Stack, I suggested giving it a named owner for certificates, renewals and bypass approvals.
A better block page is a good reason to pilot TLS inspection. It isn’t a reason to skip that thinking.
2. Choose the certificate before you build anything
TLS inspection needs a certificate authority that your devices trust. There are two options:
- Microsoft-managed (preview). Microsoft creates and runs a root CA for your tenant. You download the public root, deploy it to devices, and that’s it. The private key stays in Microsoft’s key infrastructure.
- Bring your own. You generate a certificate signing request in the portal, sign it with your own CA as an intermediate, and upload it. Microsoft provides sample scripts for Active Directory Certificate Services and OpenSSL.
Intune doesn’t decide this for you. A trusted certificate profile deploys any root, Microsoft’s or your own. What decides it is whether you already run a PKI you trust, and who needs to hold the key.
| Consideration | Microsoft-managed | Bring your own |
|---|---|---|
| Existing PKI needed | No | Yes |
| Who holds the signing key | Microsoft | You (your CA signs the intermediate) |
| Root to deploy | A new Microsoft-generated root | Often none, if devices already trust your enterprise root |
| Renewal | Create, deploy, enable a new one | Re-sign the CSR with your CA |
| Support status | Preview | Generally available |
| Best fit | Cloud-first, Intune-managed, no PKI | Regulated, existing ADCS, mixed estates |
My default is Microsoft-managed, moving to bring-your-own when key custody or an existing PKI makes it the better fit:
- Key custody. With the managed option, Microsoft holds the key that signs certificates for all of your decrypted traffic. Some regulated organisations and auditors want that root of trust held by the organisation.
- Preview status. Check the current support terms before putting it in front of production users.
- Mixed estates. If some devices aren’t in Intune, you’d be distributing a second root just for GSA.
- Existing trust. If ADCS is already well run and every device trusts the enterprise root, bring-your-own may mean no new root to deploy at all.
My lab has no PKI worth the name, so I’m using the Microsoft-managed certificate. The rest of this post follows that route and notes where bring-your-own differs.
3. Create the Microsoft-managed certificate
Creating the certificate doesn’t turn anything on. It’s created Disabled and stays that way until you enable it in section 5.
- Sign in to the Microsoft Entra admin centre as a Global Secure Access Administrator.
- Go to Global Secure Access › Secure › TLS inspection policies and open the TLS inspection settings tab.
- Select Create certificate. The menu offers Self-managed, which is the bring-your-own route, and Microsoft-managed. Select Microsoft-managed.
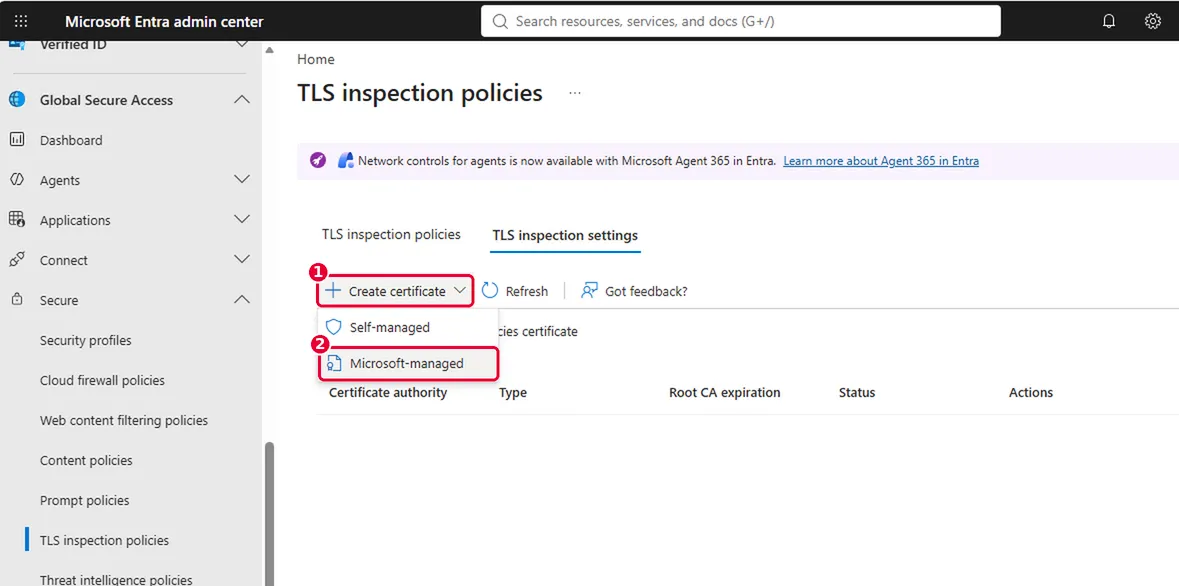
Figure 3a: ① Create certificate on the TLS inspection settings tab. ② Microsoft-managed. Self-managed is the bring-your-own option.
- Review the pane. There’s nothing to fill in. Microsoft shows you the names it will use and how often each certificate rotates. Select Create.
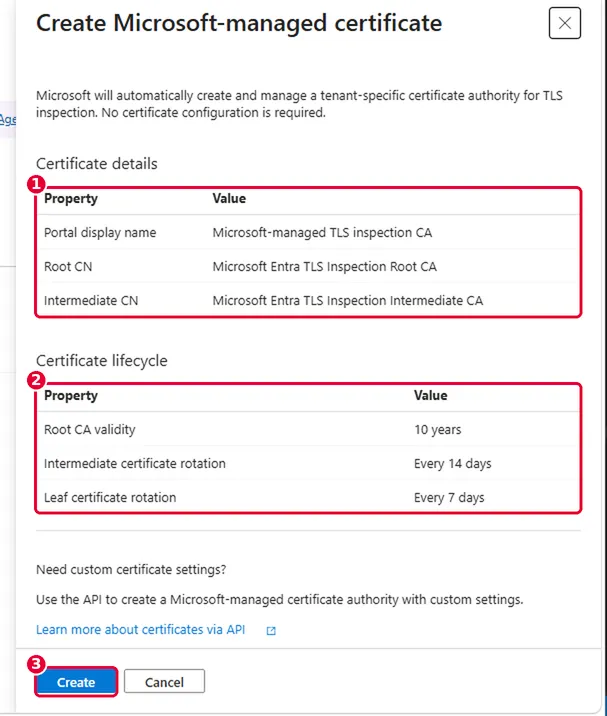
Figure 3b: ① The certificate names: the root is Microsoft Entra TLS Inspection Root CA. ② The lifecycle: a 10-year root, an intermediate that rotates every 14 days and leaf certificates that rotate every 7 days. ③ Create.
- Check the certificate is listed with Type: Managed and Status: Disabled.
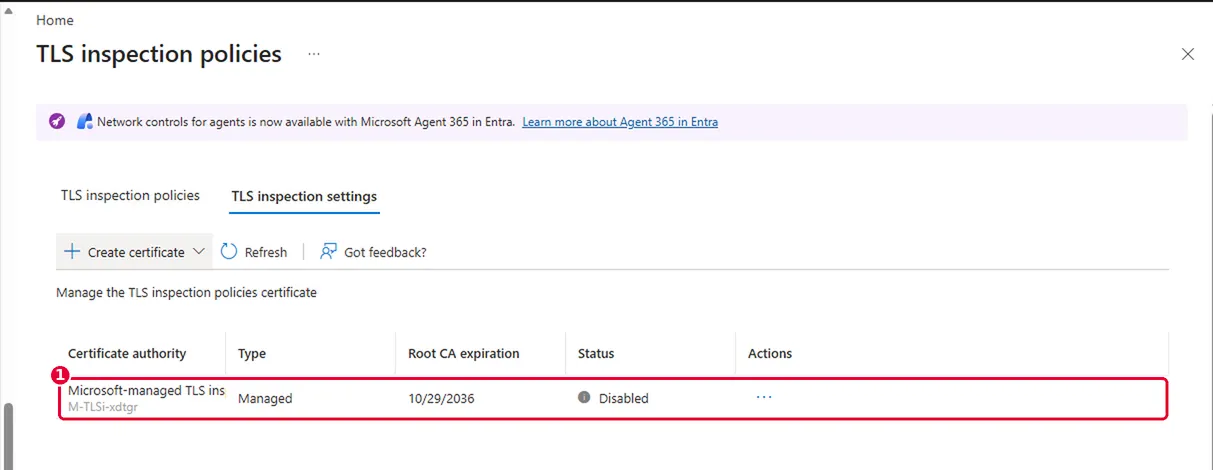
Figure 3c: The new certificate, Managed and Disabled, with a root expiry 10 years out. It does nothing until its root is on your devices and you enable it.
Only the root goes to devices. The intermediate and leaf certificates rotate on Microsoft’s side without you doing anything, which is a large part of what “managed” buys you. If you need a shorter root lifetime, Microsoft supports creating the certificate through the API with custom settings.
Bring your own instead? Select Create certificate › Self-managed to generate a CSR, sign it with your CA, then upload the signed certificate and chain as .pem files. The certificate needs Server Auth in Extended Key Usage, and CA:TRUE, keyCertSign and cRLSign in its basic constraints. The bring-your-own guide has the ADCS and OpenSSL scripts.
4. Deploy the root through Intune before enabling anything
This is the step that decides whether the pilot goes smoothly. If you enable inspection before devices trust the root, every inspected site shows a certificate error.
Download the root:
- On the TLS inspection settings tab, open the certificate’s … menu and select Download root certificate.
- Save the
.cerfile. It holds the public root only, not the private key.
Deploy it with a trusted certificate profile:
- In the Intune admin centre, go to Devices › Manage devices › Configuration, then Create › New Policy.
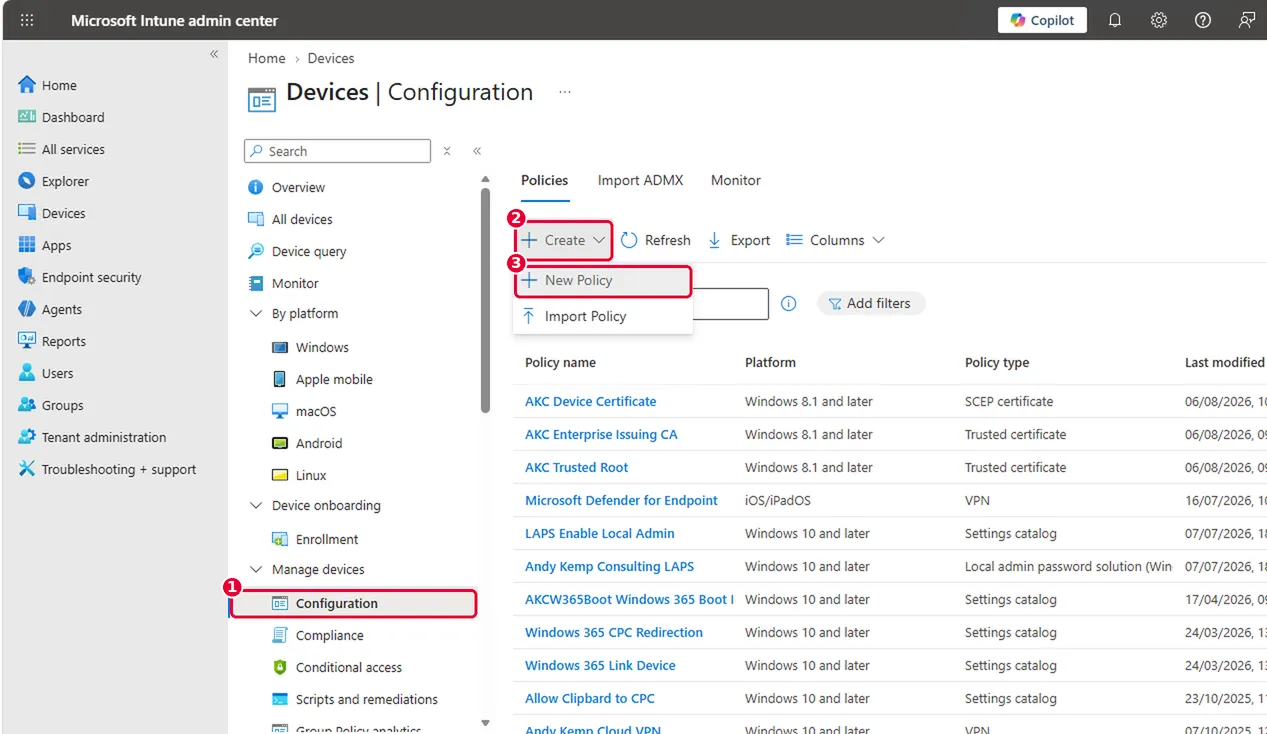
Figure 4a: ① Configuration under Manage devices, ② Create, ③ New Policy. My tenant already has trusted certificate profiles for my own lab CA. That’s the “existing trust” from section 2, deployed the same way.
- Set Platform to Windows 10 and later and Profile type to Templates, then search for and select Trusted certificate.
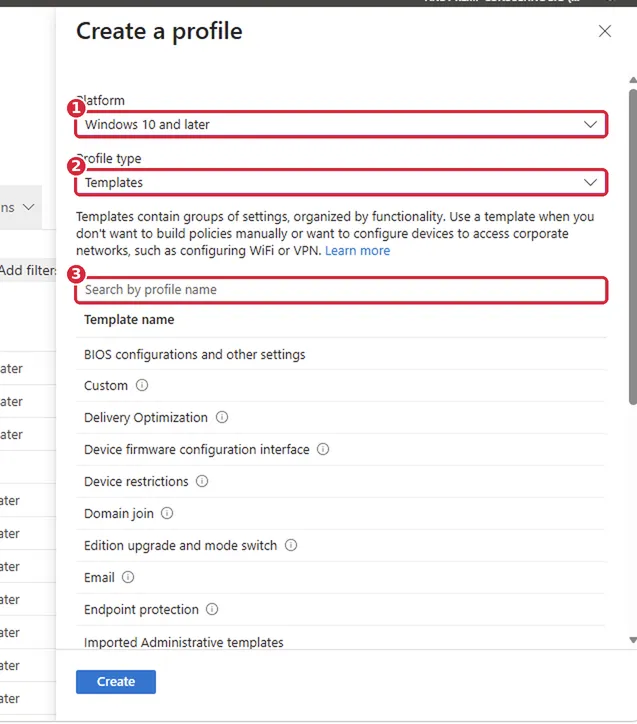
Figure 4b: ① Windows 10 and later, ② Templates, ③ search for Trusted certificate. It’s further down the list than you’d expect.
- Name the profile
GSA - TLS inspection root. - On Configuration settings, upload the
.cerfile you downloaded and set Destination store to Computer certificate store - Root.
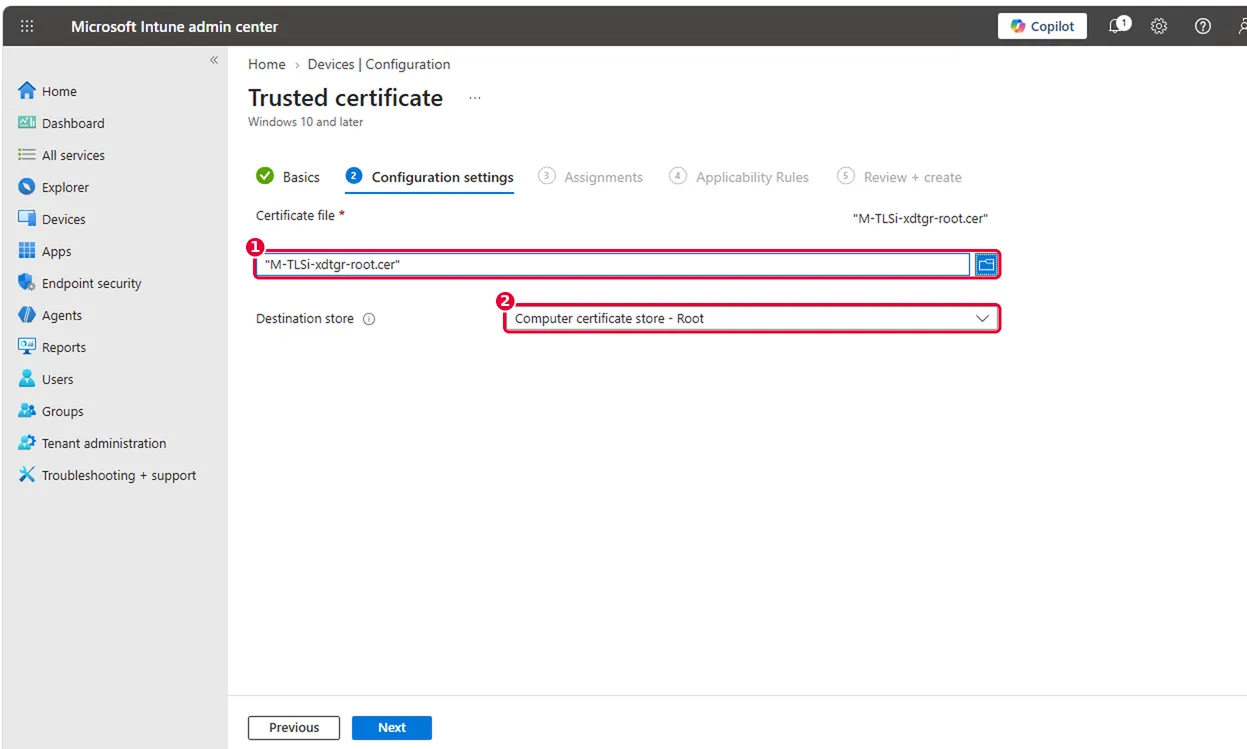
Figure 4c: ① The downloaded root, named after the certificate’s ID (
M-TLSi-…-root.cer). ② Computer certificate store - Root.
- Assign it to the device group that holds your pilot devices, then review and create. In my lab, that’s my device group of four lab machines.
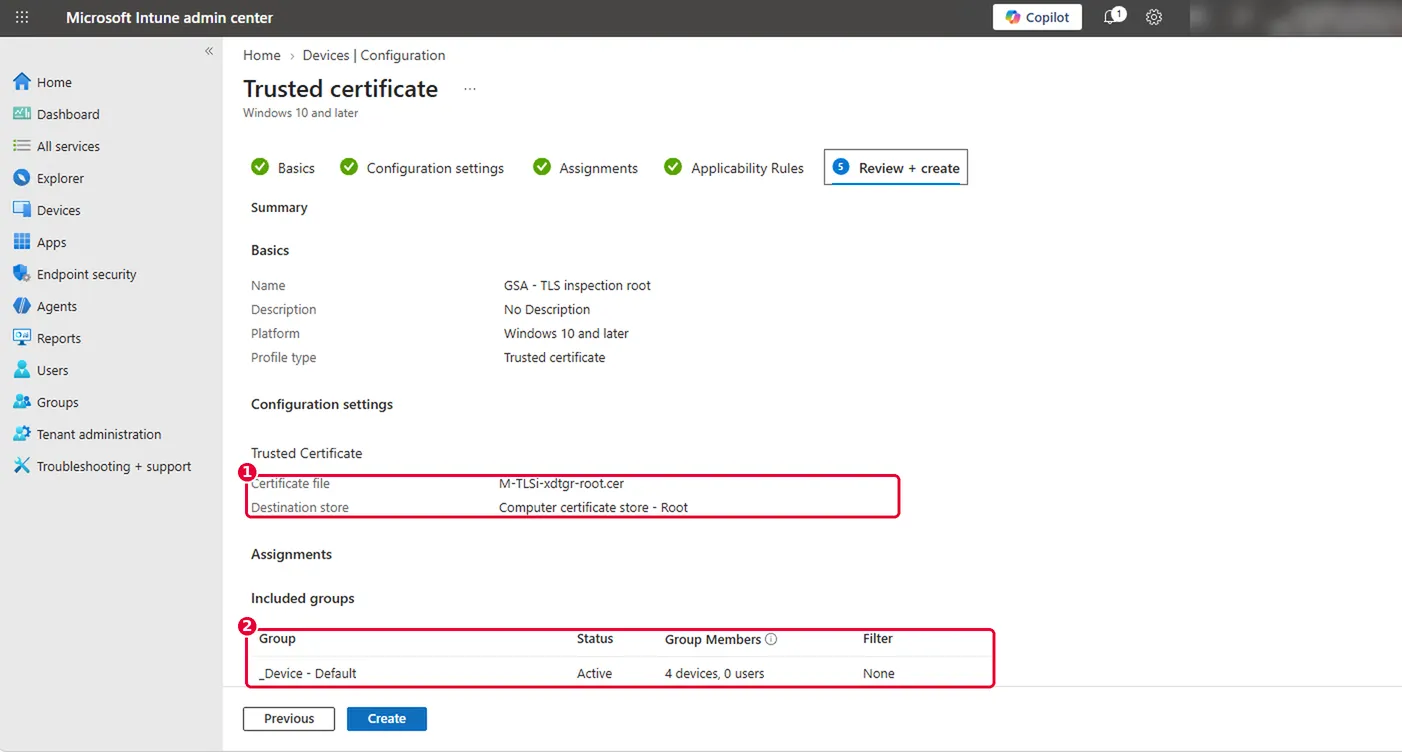
Figure 4d: The summary before creating: ① the root certificate going to the computer Root store, ② assigned to a device group.
Assign the profile to devices, not users. The certificate belongs in the computer store, so it should follow the machine.
I also added my pilot user group to the same profile. That’s optional, but it means the root follows a pilot user to any other Windows device they sign into. Keep the device group either way: it’s what puts the root on the machine before anyone signs in.
Once saved, the profile shows Windows 8.1 and later rather than Windows 10. That’s how Intune labels the trusted certificate template, so don’t go looking for a mistake.
Check it landed on a pilot device before going any further. Open certlm.msc › Trusted Root Certification Authorities › Certificates and look for the GSA root, or run:
Get-ChildItem Cert:\LocalMachine\Root |
    Where-Object Subject -like '*Microsoft Entra TLS Inspection Root CA*' |
    Select-Object Subject, NotAfter, Thumbprint
The subject matches the Root CN shown in Figure 3b. If you’re using a self-managed certificate, filter on your own CA’s name instead.
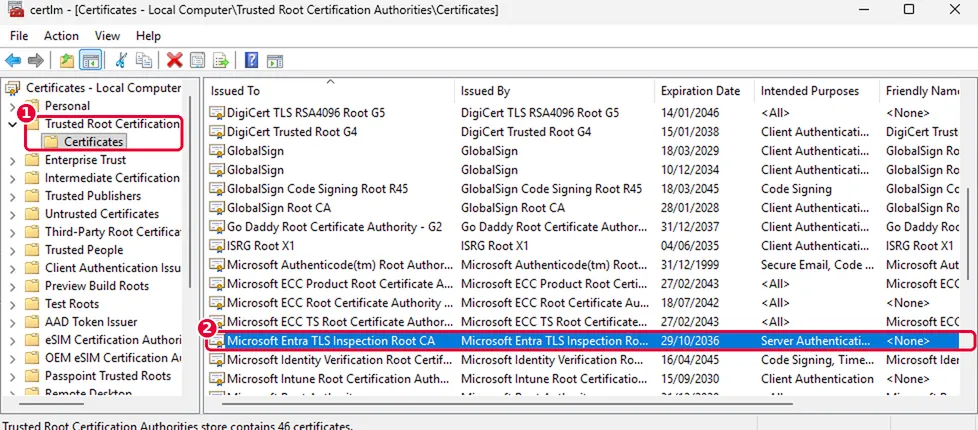
Figure 5: ① Trusted Root Certification Authorities › Certificates in the computer store (
certlm.msc). ② Microsoft Entra TLS Inspection Root CA, expiring 29/10/2036, with Server Authentication as its intended purpose.
Use the computer store, not the user store. The GSA client and every browser on the device then trust the same root, whoever signs in.
5. Enable the certificate and create the TLS inspection policy
Only enable the certificate once Figure 5 shows the root on your pilot devices.
Enable the certificate:
- On the TLS inspection settings tab, open the certificate’s … menu and select Enable.
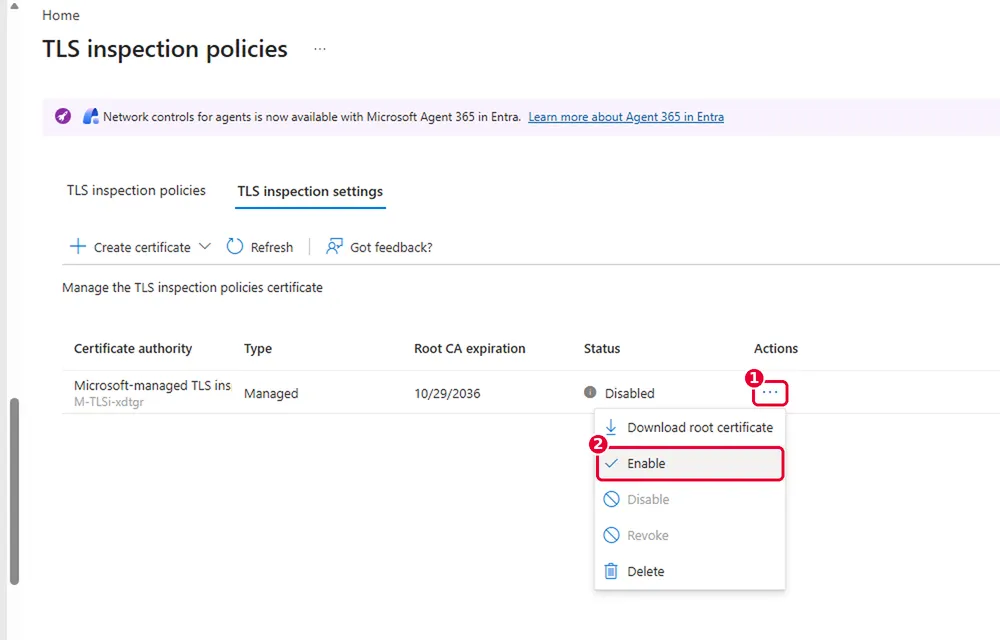
Figure 6a: ① The actions menu and ② Enable. The same menu has Download root certificate, Disable, Revoke and Delete.
- The status changes to Enrolling while Microsoft issues the intermediate.
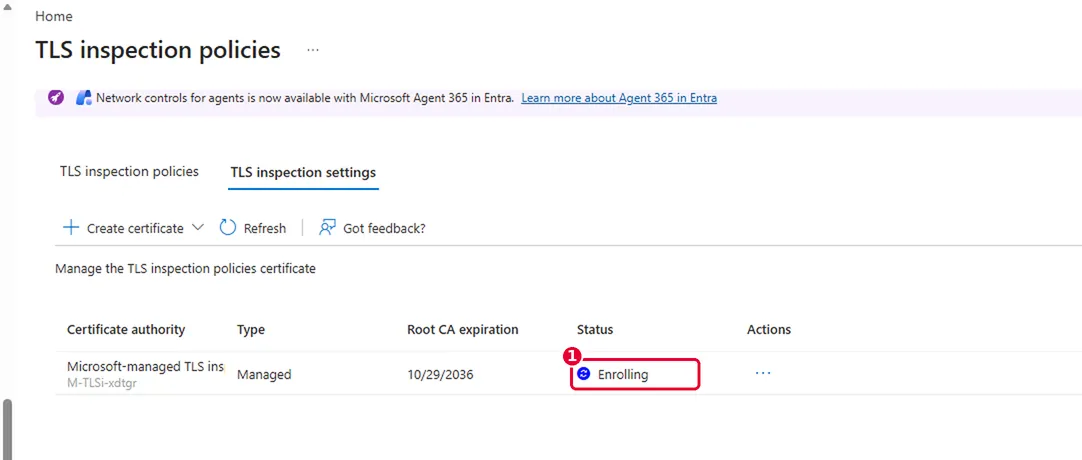
Figure 6b: The certificate Enrolling. Mine took a few minutes, so select Refresh rather than assuming something is wrong.
- Check the status changes to Active.
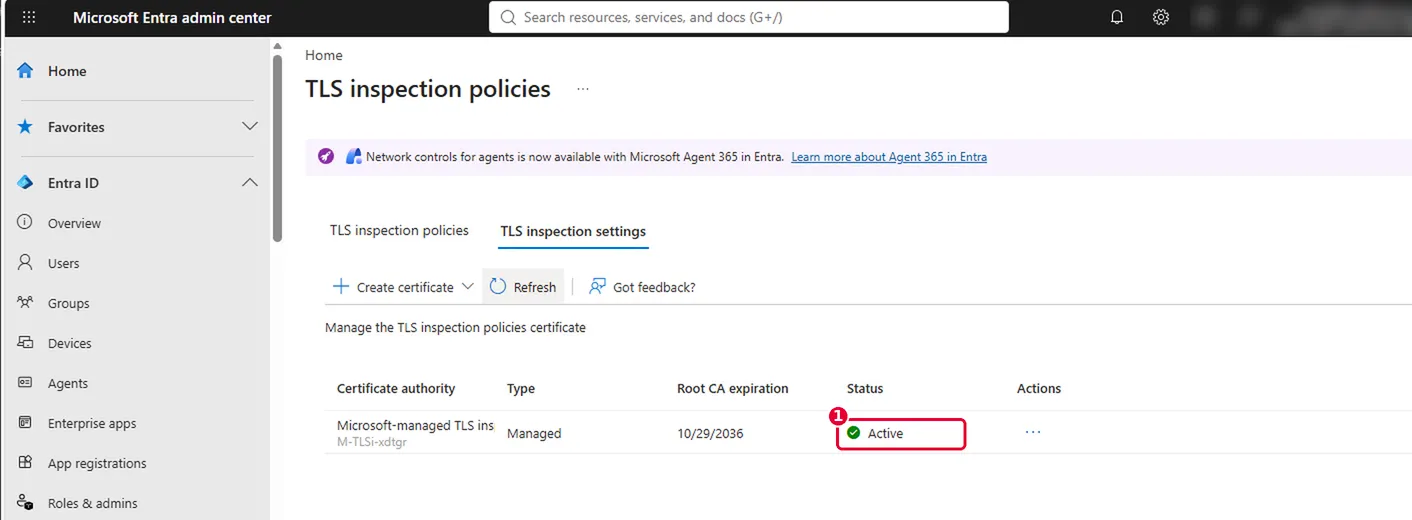
Figure 6c: The managed certificate Active.
Disable stops using the certificate but keeps it, so you can enable it again. Revoke isn’t covered in Microsoft’s documentation yet. I’d treat it as permanent and keep it for a certificate you believe is compromised. To back out quickly, use Disable.
Enabling the certificate doesn’t inspect anything yet. Inspection only starts once a policy is linked to a security profile that applies to a user.
Create the policy:
- Go to the TLS inspection policies tab and select Create policy.
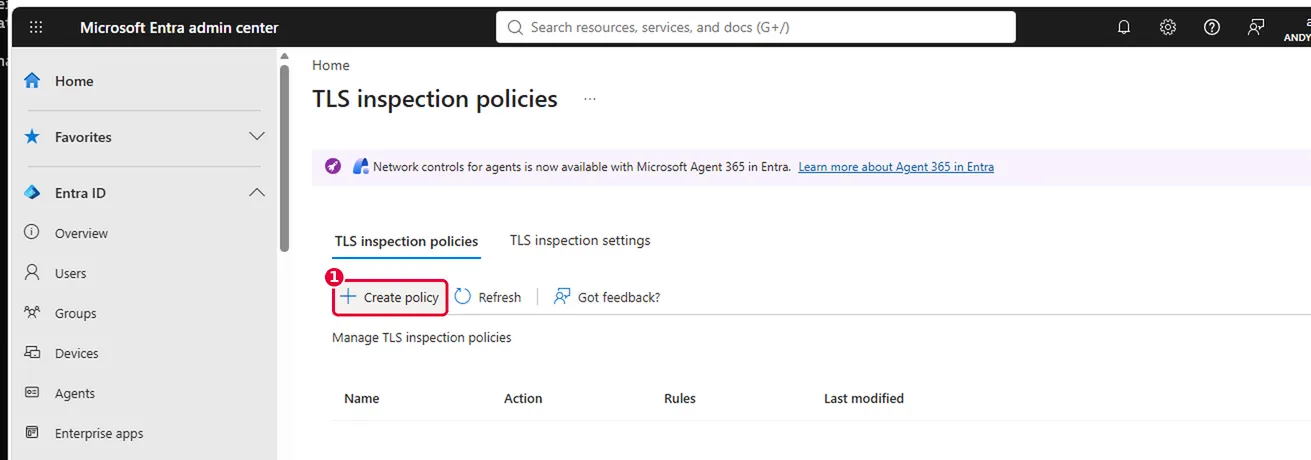
Figure 7a: Create policy on the TLS inspection policies tab.
- Name it, for example
GSA-TLS-Pilot, and set Default action to Inspect.
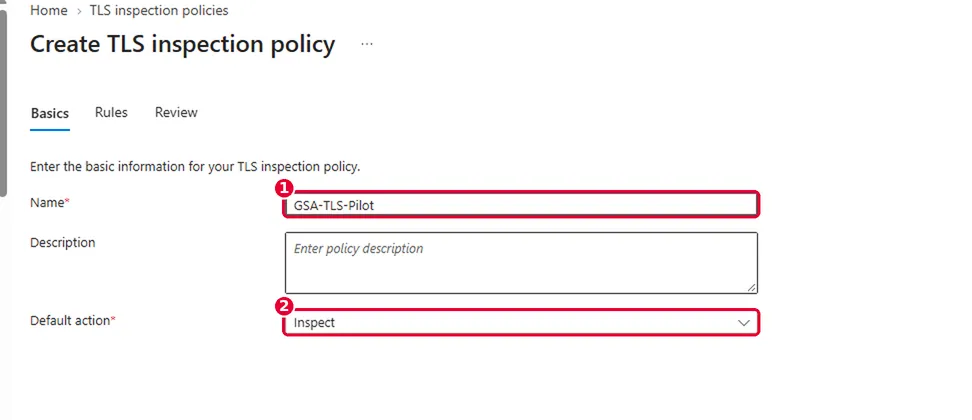
Figure 7b: ① The policy name and ② Default action: Inspect.
- Select Next through Rules and Review, then Submit.
Don’t worry when the Rules tab is empty and the review says Rules: 0. The two system-generated rules only appear once the policy exists. After you submit, the list shows the policy with 2 rules:
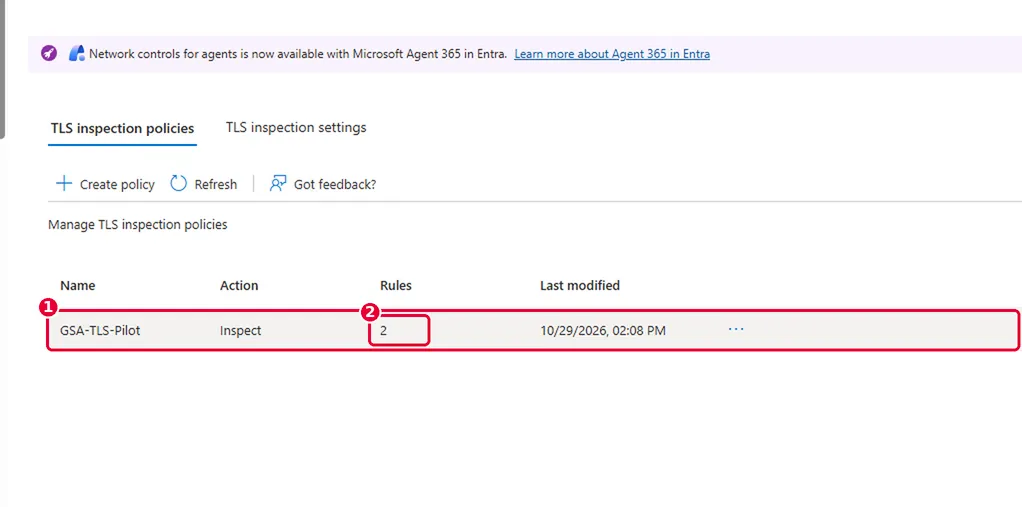
Figure 7c: ①
GSA-TLS-Pilotwith Inspect as its action, and ② 2 rules that weren’t there during creation.
Open the policy with Edit and select Rules to see what was added:
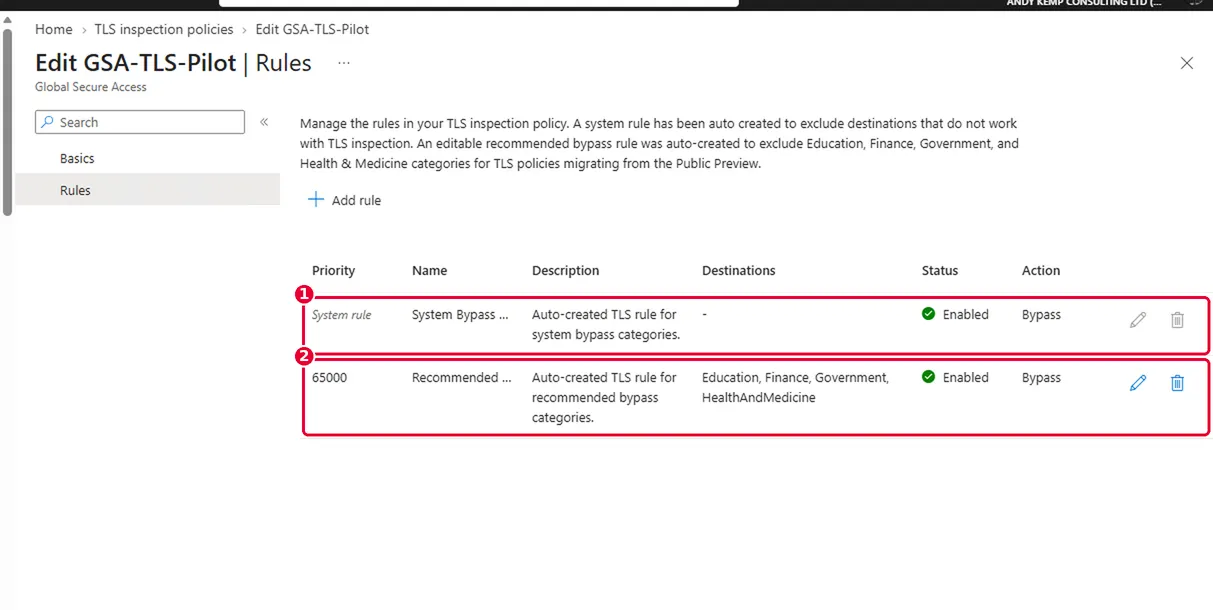
Figure 7d: ① The system bypass for destinations known not to work with TLS inspection. You can’t edit or delete it. ② The recommended bypass, priority 65000, for Education, Finance, Government and Health & Medicine. You can edit this one.
- The system bypass covers destinations Microsoft knows break under inspection, such as apps that pin certificates.
- The recommended bypass covers categories users would reasonably consider private.
Keep both. If you remove the recommended bypass, you’re deciding to decrypt users’ banking and health sessions. That’s a decision for your privacy and legal teams, not a lab default.
6. Scope inspection to the pilot with its own security profile
A block page only appears when something is blocked, so you need a block rule to test with. You probably have one already. Mine live in the Baseline profile:
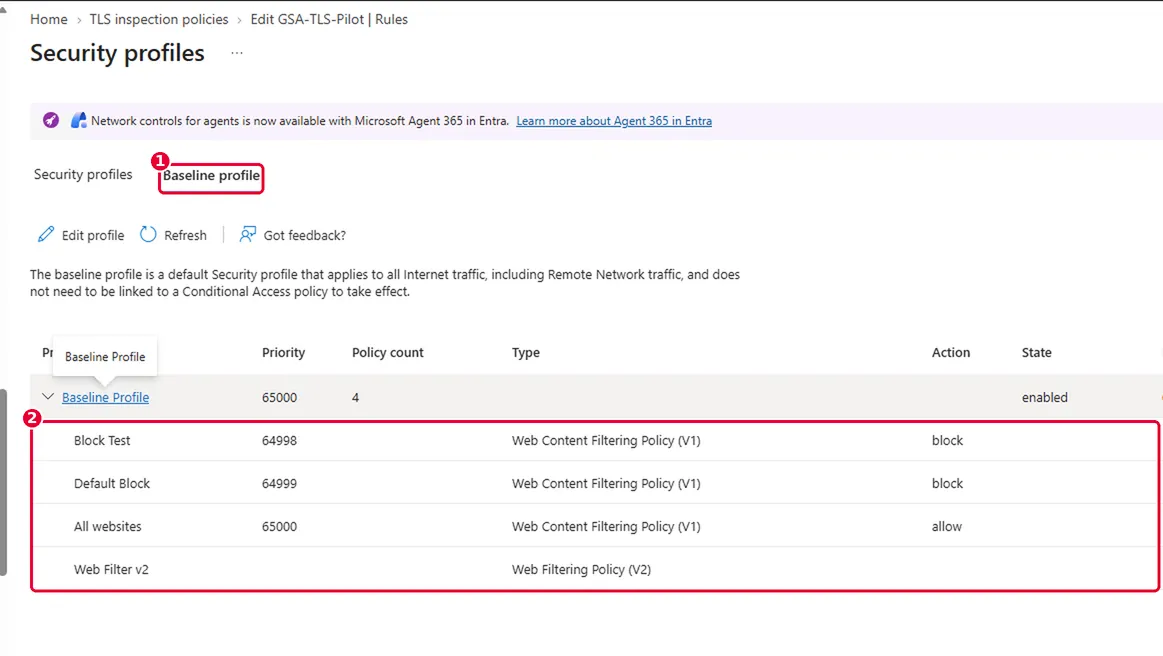
Figure 8a: ① The Baseline profile tab. ② My existing web content filtering policies, including the gambling block from Figure 1. The baseline applies to all Internet Access traffic in the tenant, with no Conditional Access targeting.
That’s exactly why TLS inspection doesn’t go in the Baseline profile during a pilot. Linking it there would inspect every user and every device at once, including devices that don’t trust the root yet. In my tenant, that would have broken HTTPS on my Mac, which the Windows-only Intune profile from section 4 doesn’t cover.
Instead, create a separate profile that holds only the TLS inspection policy, and assign it to the pilot through Conditional Access. Profiles stack: pilot users get the pilot profile first and the baseline after it. Their traffic is inspected, and the existing baseline blocks still apply, now with a block page they can actually see.
If you don’t have a block rule yet, create a web content filtering policy that blocks a harmless test FQDN such as www.example.com. Link it to the same pilot profile.
Create the pilot profile:
- Go to Global Secure Access › Secure › Security profiles. Stay on the Security profiles tab and select Create profile.
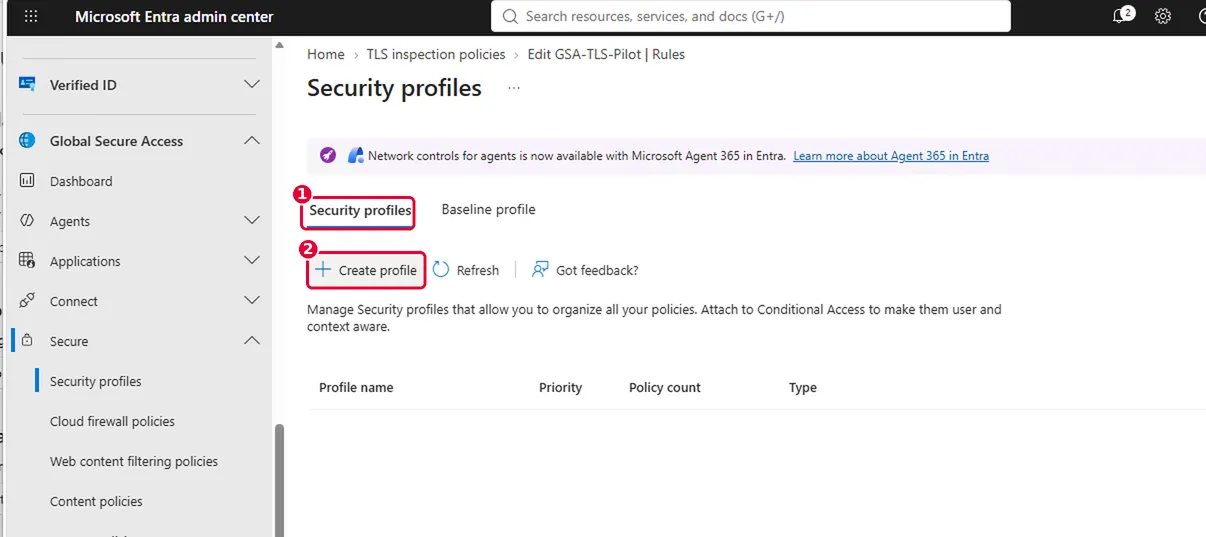
Figure 8b: ① The Security profiles tab, not Baseline, and ② Create profile.
- On Basics, name it
GSA-Pilot-Profile, leave State as enabled and set a Priority. I used 100.
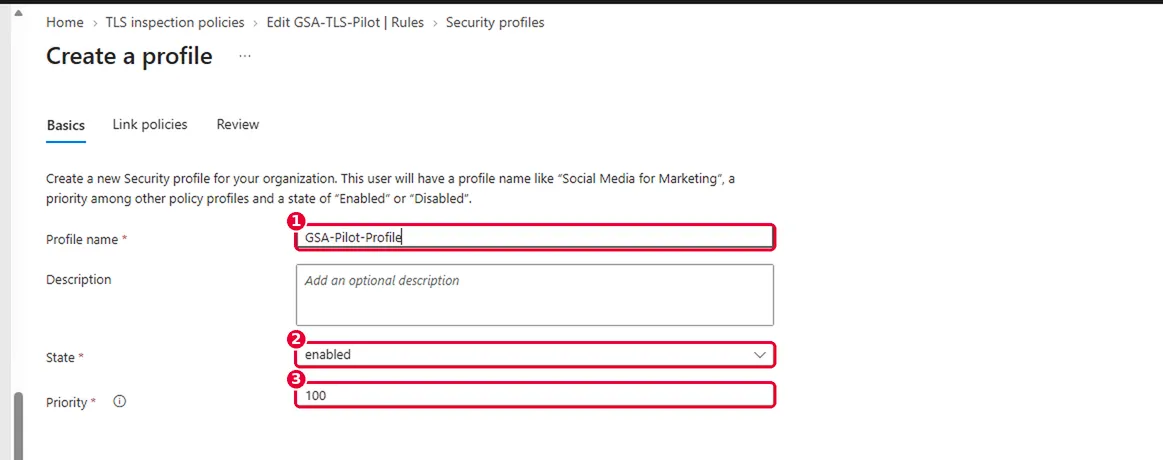
Figure 8c: ① The profile name, ② state and ③ priority. Lower numbers are evaluated first. The baseline sits at 65000.
- On Link policies, select Link a policy › Existing TLS inspection policies.
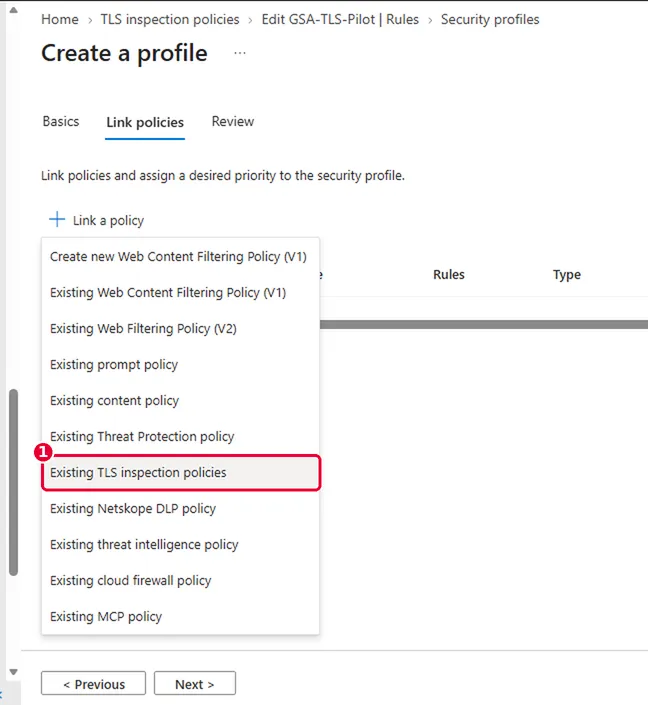
Figure 8d: The Link a policy menu, with Existing TLS inspection policies highlighted. The same menu links web filtering, prompt, content, threat intelligence, cloud firewall and MCP policies. Be careful with the first option: Create new Web Content Filtering Policy creates a new block policy, not a link to your TLS policy. I chose it by mistake the first time.
- Choose
GSA-TLS-Pilot, leave State as Enabled, and select Add.
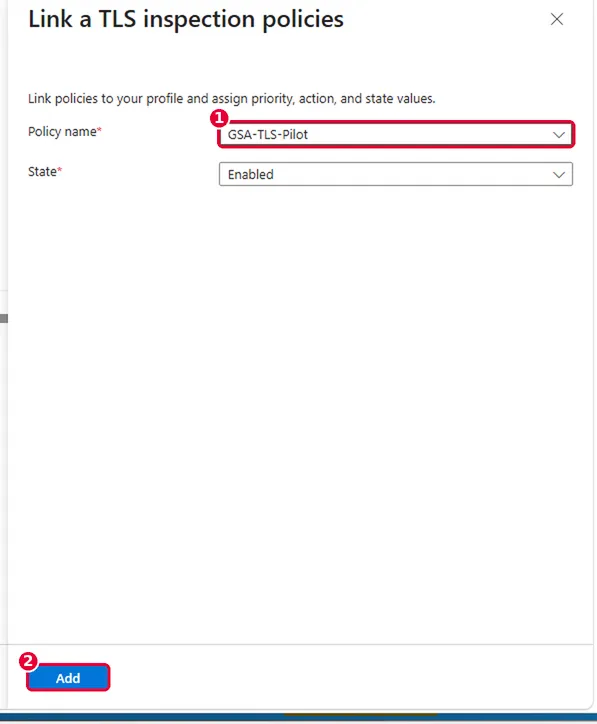
Figure 8e: ①
GSA-TLS-Pilotselected, then ② Add.
- Review and select Create a profile.
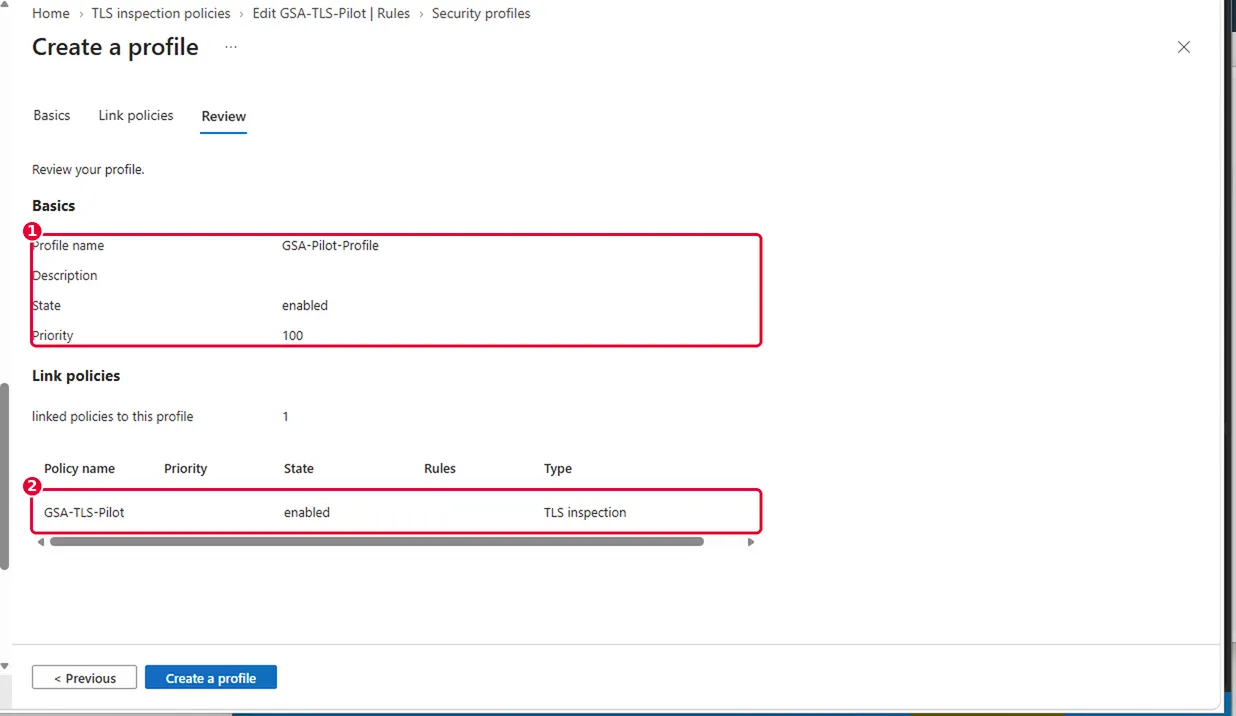
Figure 8f: ①
GSA-Pilot-Profile, enabled, priority 100. ② One linked policy:GSA-TLS-Pilot, type TLS inspection.
Assign the profile through Conditional Access:
- Go to Entra ID › Conditional Access › Policies › New policy and name it
GSA - Pilot security profile. - Target resources: set Select what this policy applies to to Resources (formerly cloud apps), then include All internet resources with Global Secure Access.
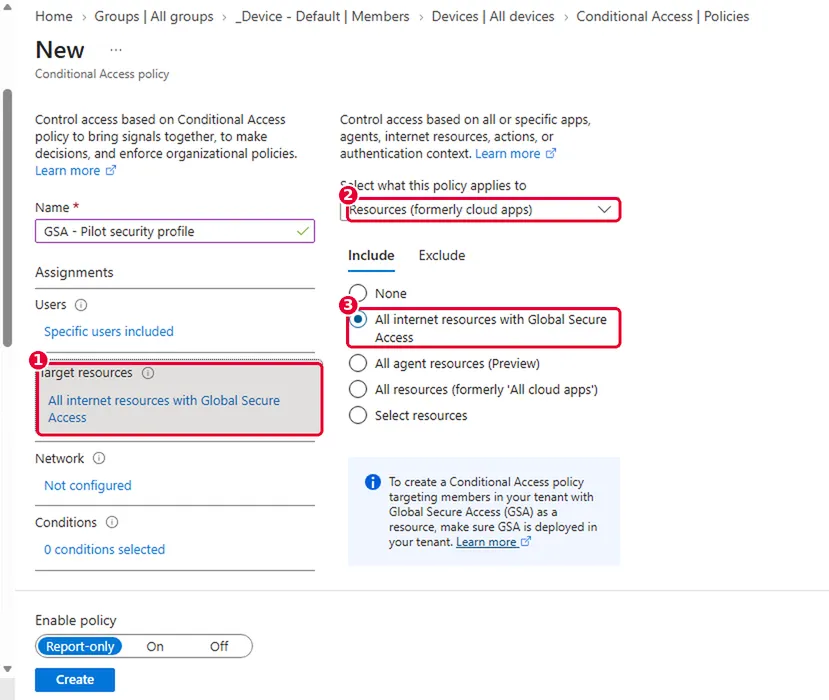
Figure 9a: ① Target resources, ② Resources (formerly cloud apps) and ③ All internet resources with Global Secure Access.
- Session: tick Use Global Secure Access security profile and choose
GSA-Pilot-Profile.
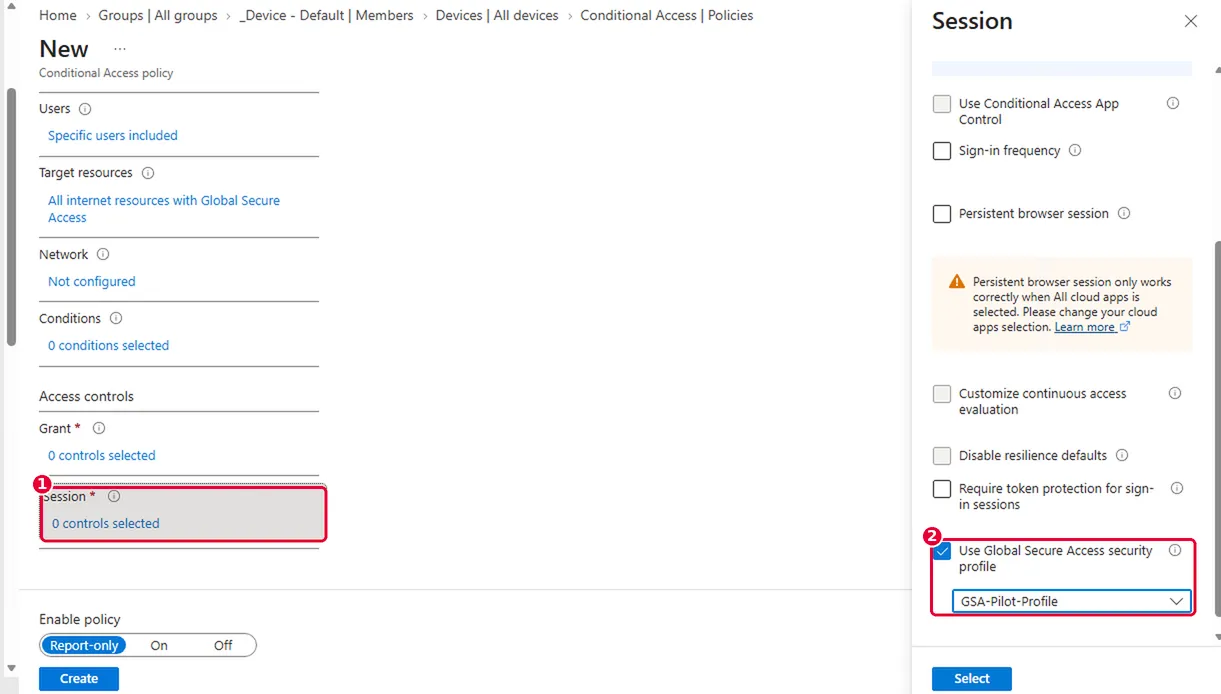
Figure 9b: ① Session and ② Use Global Secure Access security profile, set to
GSA-Pilot-Profile.
If the checkbox is greyed out, you haven’t set the target resource yet. The session control only works for policies that target Global Secure Access resources, so do step 2 first. That caught me out.
- Users: include GSA-Pilot-Users.
- Set Enable policy to On and select Create.
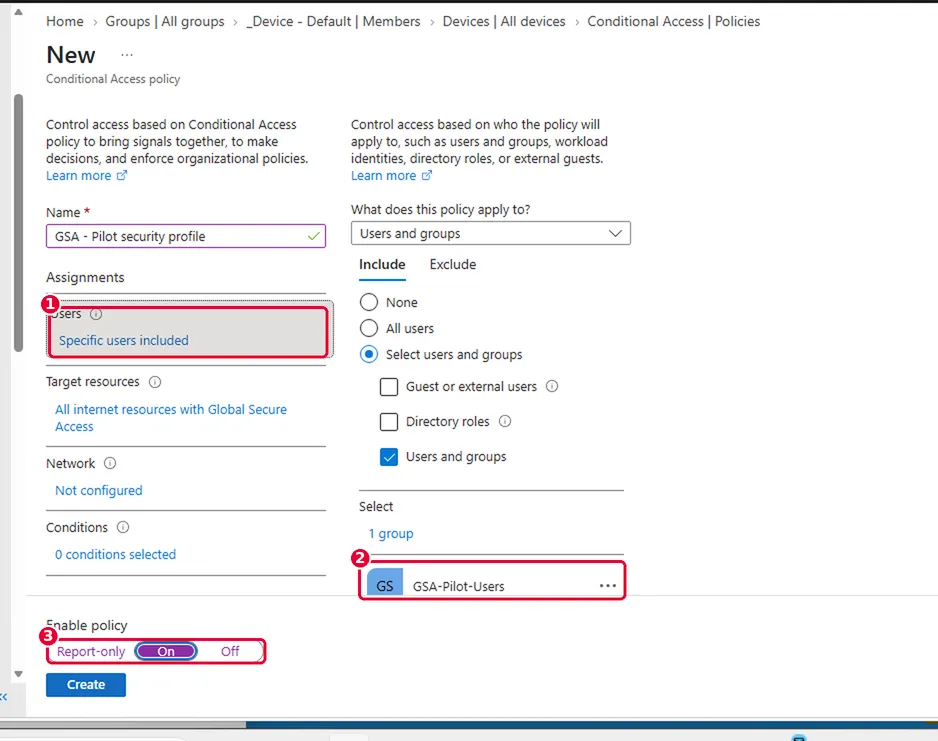
Figure 9c: ① Users, ②
GSA-Pilot-Users, and ③ Enable policy: On. New policies default to Report-only, so change it.
Report-only is the right habit for grant controls, but it doesn’t help here. This policy doesn’t grant or block sign-ins. It only tells Global Secure Access which security profile applies to the user, and in report-only mode the profile isn’t assigned at all, so there’s nothing to test.
Microsoft notes it can take up to an hour for a new security profile to take effect after Conditional Access assigns it. Note the time, and plan your test for later rather than troubleshooting at minute five. Nothing needs to sync to the device: security profiles and TLS inspection run in the service, not the client.
7. Close the routes around inspection
Internet Access doesn’t acquire QUIC (HTTP/3 over UDP 443). If a browser negotiates QUIC with a site, that connection never reaches the inspection service. Microsoft’s operations guidance names ChatGPT, Claude, Gemini and most AI sites as examples. These are exactly the sites many organisations want to inspect.
In Part 1, we turned QUIC off in Edge and Chrome with a settings catalog profile. That covers browsers. Microsoft also warns that browser and OS updates can turn QUIC back on, and other apps use it too. So for inspection, block it at the firewall as well.
Block outbound UDP 443 with Intune:
- In Intune, go to Endpoint security › Firewall › Create Policy. Set Platform to Windows and Profile to Windows Firewall Rules.
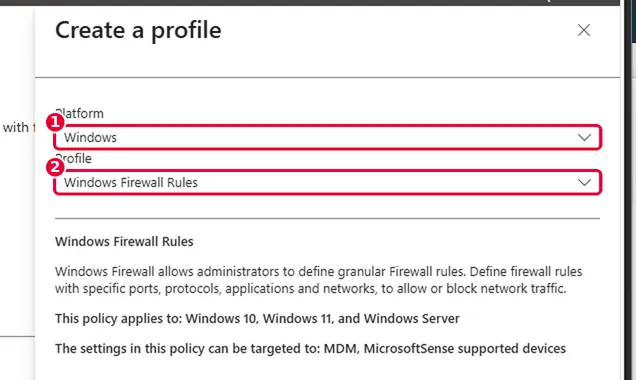
Figure 10a: ① Windows and ② Windows Firewall Rules.
- On Basics, name the policy
GSA - Block QUIC. - On Configuration settings, select Add, name the rule
Block QUIC, and set Action to Block. Then select Edit instance.
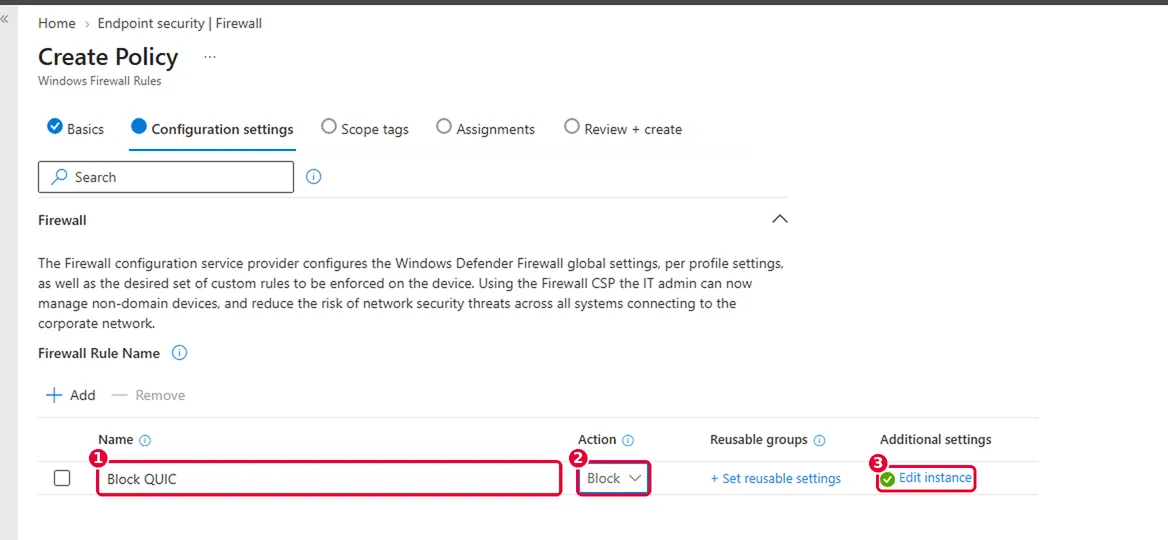
Figure 10b: ① The rule name, ② Action: Block and ③ Edit instance. Check the action after you type the name: mine showed Allow until I changed it. An Allow rule for UDP 443 does the opposite of what you want.
The Edit instance pane lists every setting the Windows Firewall CSP supports, which looks far more complicated than this rule is. Only four settings matter. Leave everything else as Not configured, because each extra setting narrows the rule and lets QUIC from other apps or networks through.
| Setting | Value |
|---|---|
| Enabled | Enabled |
| Remote Port Ranges | 443 |
| Protocol | 17 (UDP) |
| Direction | Outbound |
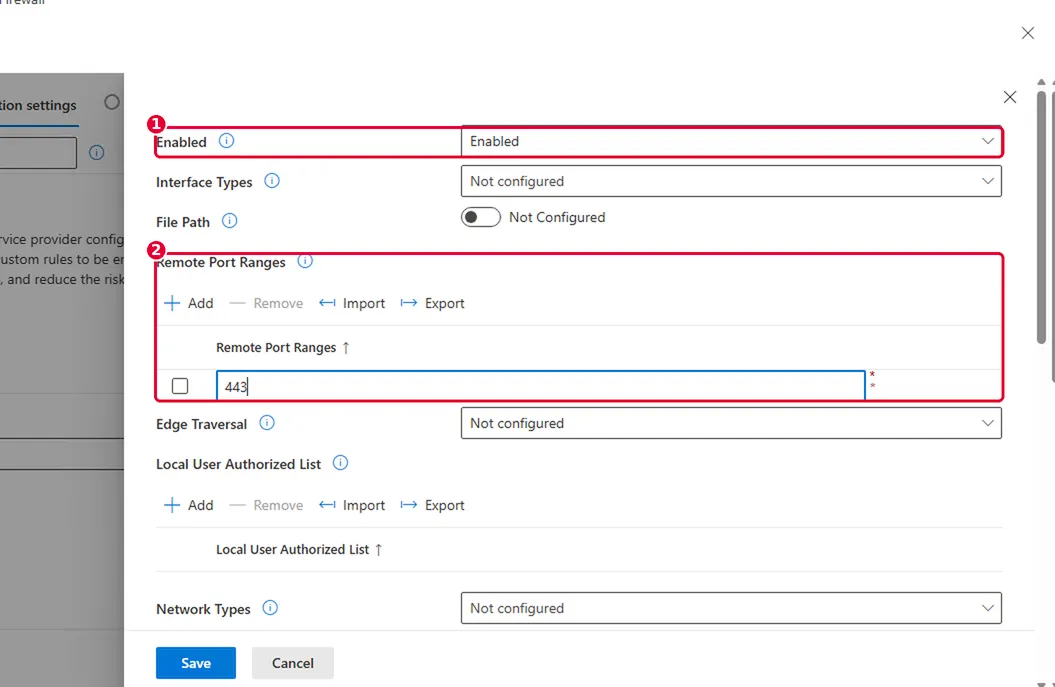
Figure 10c: ① Enabled and ② Remote Port Ranges: 443, near the top of the pane.
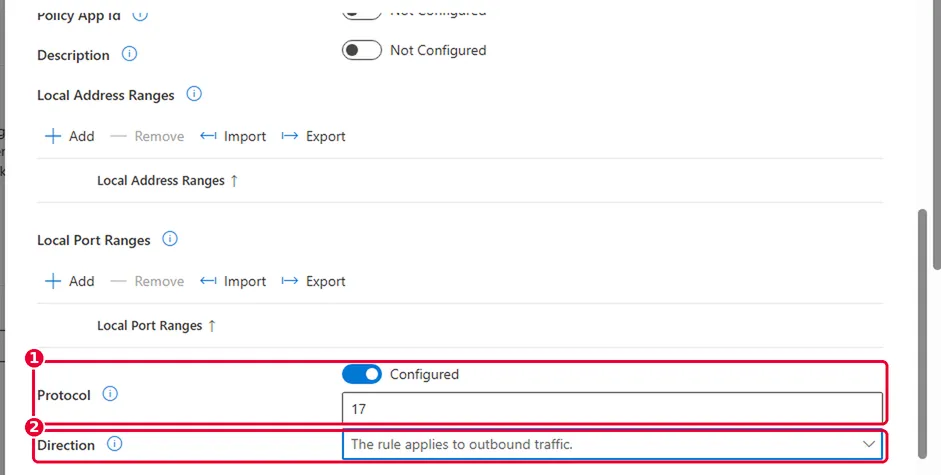
Figure 10d: Scroll down for ① Protocol: 17, which is UDP, and ② Direction: The rule applies to outbound traffic.
- Select Save, then assign the policy to your pilot device group and create it.
To test the rule on a single device before deploying it, Microsoft gives the PowerShell equivalent:
New-NetFirewallRule -DisplayName "Block QUIC" -Direction Outbound -Action Block -Protocol UDP -RemotePort 443Browsers fall back to HTTPS over TCP when QUIC fails, so users shouldn’t notice. The rule also blocks QUIC for Private Access and Microsoft 365, which do support it. Those connections fall back to TCP as well. I’d rather lose QUIC everywhere than leave a route around inspection.
Check DNS-over-HTTPS is still off. The Part 1 browser profile also turned off DNS-over-HTTPS. If it’s drifted, FQDN rules stop matching. On a pilot device, edge://policy should still show QuicAllowed as false and DnsOverHttpsMode as off.
8. Configure the custom block page
This is the shortest step in the post, and it only works because of everything before it.
- Go to Global Secure Access › Settings › Session management and open the Custom Block Page tab.
- Turn Custom body message on.
- Write your message in Body message and select Save.
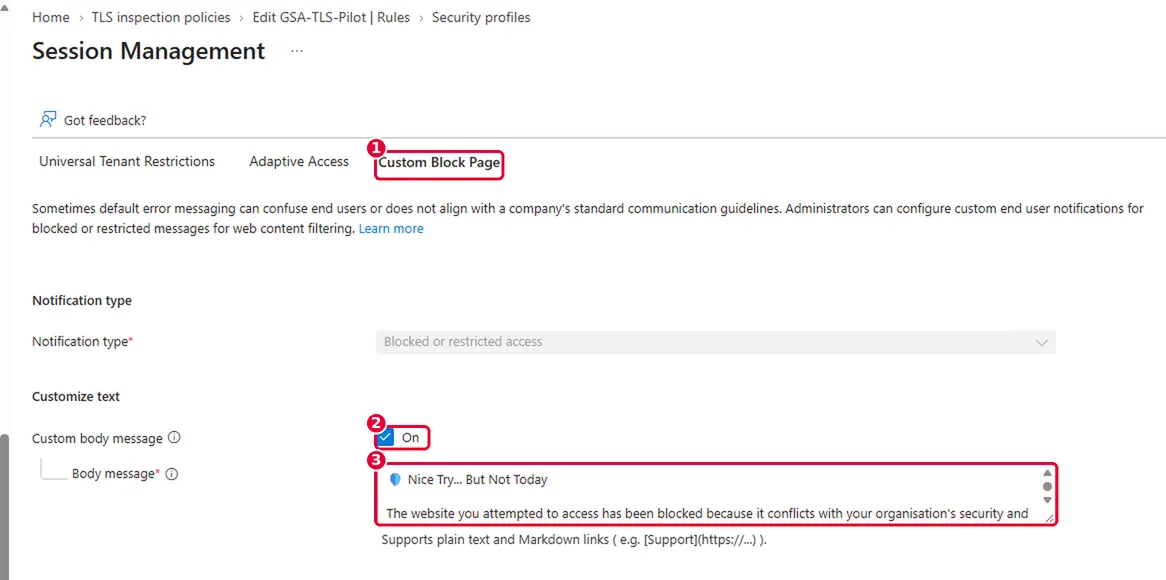
Figure 11: ① The Custom Block Page tab, ② Custom body message: On, and ③ the message. The Notification type is fixed at Blocked or restricted access.
Mine opens with “Nice Try… But Not Today”, says the site conflicts with the organisation’s security and acceptable use policies, and asks users to contact the IT Service Desk with the URL, a business justification and the time of the attempt. It ends with a Contact IT Support link. You can see the result in Figure 2.
A few things to know:
- Line breaks don’t survive. I wrote mine as separate lines with bullet points, and it rendered as a single paragraph with the bullets run together (Figure 2). Write it as one short paragraph.
- It’s plain text plus Markdown links. The box says so:
[Support](https://...)works, but other formatting doesn’t. - The body message is limited to 1,024 characters. Tell users what happened and how to get help.
- Link to a process, not a person. Point users to a form or service desk rather than one named person’s email address. Check what you publish against your privacy policy.
- It’s one message for the whole tenant. It applies to every block page Global Secure Access serves, not just this pilot.
- Changes can take a few minutes to reach active sessions. If saving fails, Microsoft lists a known transient issue: configure the page again and save.
9. Verify inspection is actually happening
A block page proves something was blocked. It doesn’t prove the rest of your traffic is being inspected. Check that first, on a pilot device signed in as a pilot user, after the security profile has had time to apply.
1. The traffic goes through Internet Access. Open Advanced diagnostics › Traffic, start collecting, and browse to a non-Microsoft site such as https://www.wikipedia.org. The connection should show Channel: Internet Access and Action: Tunnel. Part 2 covers reading this tab.
2. The certificate chains to the GSA root. In the browser, select the padlock, open the certificate details, and look at the issuer chain. On an inspected site, the top of the chain is the GSA root you deployed in section 4, not the site’s public CA.
Figure 12 — screenshot pending: The certificate viewer on an inspected site, with the chain ending in the GSA root.
3. The bypass rules work. Browse to a site in a bypassed category, such as your bank’s public website. Its certificate should show the bank’s real public CA. That proves the recommended bypass is doing its job, which is worth evidencing before anyone asks.
4. Microsoft traffic isn’t inspected. Microsoft 365 traffic goes through the Microsoft traffic profile, so it shouldn’t show the GSA root either. Don’t test with a Microsoft site and conclude inspection is broken.
10. Prove the block page
Now the test this post is about.
- Close Edge completely, so you’re not reusing an old connection, then start a fresh Traffic collection in Advanced diagnostics.
- Browse to
https://playright.co.uk, the same site as Figure 1. - You should see your custom block page, not a connection reset.
- Stop the collection and find the
playright.co.ukconnection.
Figure 13 — screenshot pending: The custom block page for
playright.co.ukin the browser.
Then check the service saw it too. In the Entra admin centre, go to Global Secure Access › Monitor › Traffic logs, filter by the pilot user and destination playright.co.uk, and open the entry. It should show the block action and the policy that applied.
Figure 14 — screenshot pending: The traffic log entry for the blocked request, showing the block action and the matching policy.
Compare Figure 13 with Figures 1 and 2 at the start of the post: the same kind of block, now visible over HTTPS.
Record the result:
| Check | Expected result | Lab result |
|---|---|---|
| Root deployed | GSA root in the computer Trusted Root store | Not yet captured |
| Certificate active | Managed certificate Active | Not yet captured |
| Profile assigned | Pilot user gets GSA-Pilot-Profile via Conditional Access |
Not yet captured |
| Inspection | Non-Microsoft site chains to the GSA root | Not yet captured |
| Bypass | Banking site shows its real public CA | Not yet captured |
| Block page | playright.co.uk shows the custom page, not a reset |
Not yet captured |
| Service evidence | Traffic log shows the block for the pilot user | Not yet captured |
11. Troubleshoot the stage that failed
| Symptom | Likely cause | What to check |
|---|---|---|
| Certificate errors on every inspected site | The root isn’t trusted, or it went into the user store rather than the computer store | Figure 5 on the affected device. The Intune profile status. Unlink the TLS policy while you fix it |
Still connection reset on playright.co.uk |
TLS inspection isn’t applying to this user yet | Has the profile had up to an hour? Is the user in the Conditional Access policy? Does the site chain to the GSA root (section 9)? |
| A site loads without the GSA root | QUIC, a bypass category, Microsoft traffic, or IPv6 | Firewall rule status. edge://policy. Health check for IPv4 preferred. Advanced diagnostics channel |
| One app or site breaks, others are fine | Certificate pinning, or a protocol the service doesn’t support under inspection (Microsoft lists HTTP/2 negotiation) | Add a TLS inspection bypass rule for that FQDN in the policy. Don’t reach for a traffic forwarding bypass first |
| Developer tools fail, such as Git, Python, Node or Java | They use their own trust stores, not the Windows store | Point each tool at the GSA root, for example NODE_EXTRA_CA_CERTS for Node, or bypass the destinations they need |
| The default block message appears | The custom page hasn’t saved or propagated | Re-open Custom Block Page, save again and wait a few minutes |
The fourth row deserves care. A TLS inspection bypass keeps the connection in Global Secure Access but doesn’t decrypt it, so FQDN filtering and logging still apply. A traffic forwarding bypass sends it straight out of the device, with no controls at all. I made the same distinction in Part 7 of the strategy series. Use the narrowest one that fixes the problem.
12. Plan renewal and rollback before you need them
Renewal. An expired inspection certificate turns off inspection, URL filtering and the block page in one go, and nobody gets an alert from the browser. Put the date in your runbook now.
- Microsoft-managed: the root lasts 10 years and the intermediate and leaf certificates rotate automatically, so renewal is rare. When it’s due, create a new managed certificate, deploy its root, enable it, validate, then delete the old one. Don’t remove the old root from devices until the new one is proven.
- Bring your own: Microsoft recommends at least six months’ validity and starting renewal 90 days before expiry. Generate a new CSR, sign it, deploy any new chain, then activate it.
Rollback. Undo it in the reverse order you built it, so devices never see inspection without trust:
- Stop inspection: unlink
GSA-TLS-PilotfromGSA-Pilot-Profile, or remove the pilot user from the Conditional Access policy. Users go back to FQDN filtering and connection resets. - Remove the policy: delete
GSA-TLS-Pilotfrom TLS inspection policies. - Remove the certificate: delete it from TLS inspection settings.
- Remove device trust last: unassign the Intune trusted certificate profile, then check the root has left the computer store.
- Decide on QUIC: keep the firewall rule if Internet Access stays in place, because it helps FQDN filtering as well.
If something breaks badly mid-pilot, step 1 alone is enough to restore normal browsing. Leave everything else in place while you investigate.
Why it matters
TLS inspection is what turns Internet Access from “block this domain” into real web security: URL filtering, file and content policies, and newer controls such as the MCP firewall all depend on it. The block page is the visible part. The certificate, its owner and its renewal date are the part that keeps it working.
What’s next
Part 5 builds on this with web content filtering: the baseline profile versus security profiles assigned through Conditional Access, and how policy priority lets you layer exceptions.
References
- Configure TLS inspection with a Microsoft-managed certificate (preview)
- Configure TLS inspection with your own certificate
- Configure TLS inspection policies
- Customise the Global Secure Access block page
- Tutorial: web content filtering and the connection reset error
- Operate Microsoft Entra Internet Access (QUIC, certificate renewal)
- Trusted root certificate profiles in Intune
- Known limitations for Global Secure Access
Last checked against Microsoft documentation: 26 October 2026.
Comments
No comments yet — be the first to leave one below.
Published — it will appear for everyone in a couple of minutes once the site updates.